FF – Fast Forward
mpeg – Moving Picture Experts Group
音视频的广泛应用
- 直播类:音视频会议、教育直播、娱乐/游戏直播等
- 短视频:抖音、快手、小咖秀等
- 网络视频:优酷、腾讯视频、爱奇艺等
- 音视频通话:微信、QQ、Skype 等
- 视频监控
- 人工智能:人脸识别、智能音箱等,更关注算法
音视视频基础知识
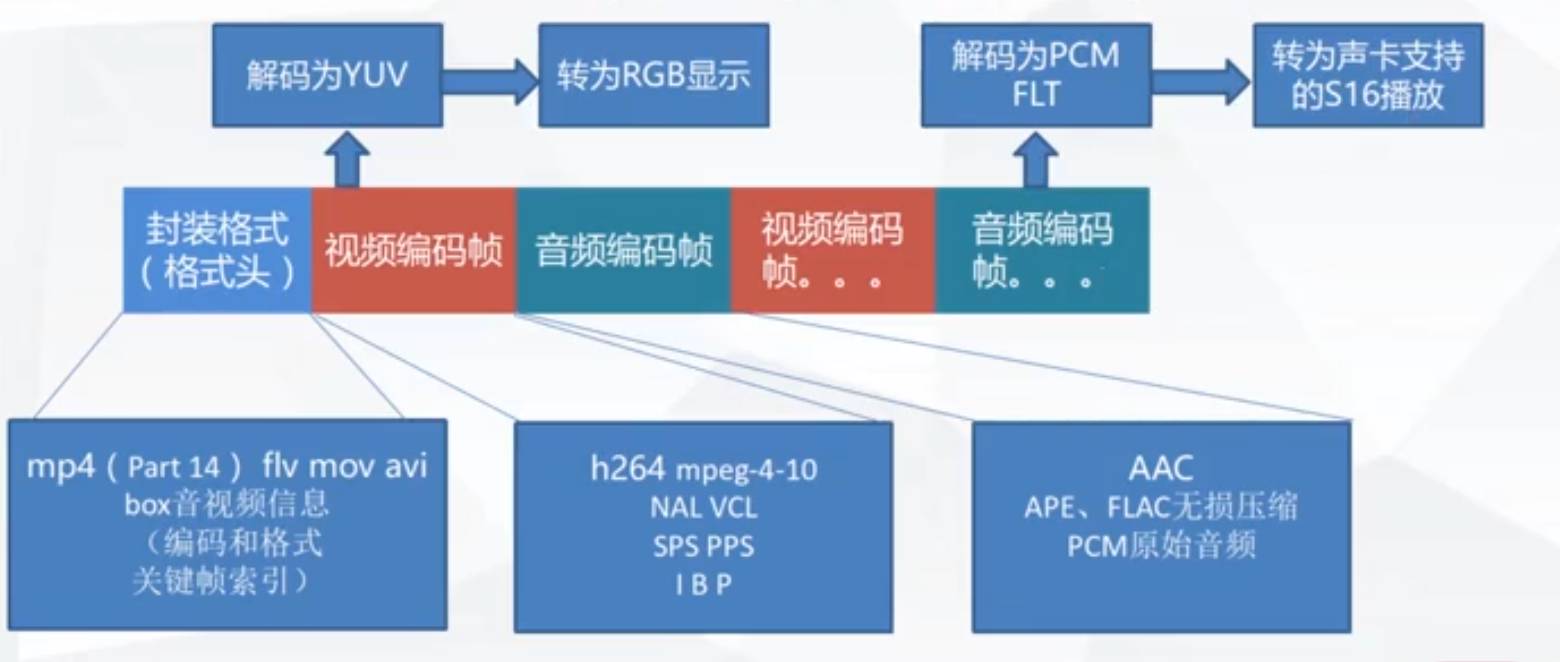
音视频封装和编码格式
像素格式
- BGRA RGBA ARGB32 RGB32 YUV420
- R = Y + 1.4075 * (V-128);
- G = Y – 0.3455 * (U-128) – 0.7169*(V-128);
- B = Y + 1.779 * (U-128);
Y 表示明亮度,也即灰度值;U 和 V 表示色度
PCM音频参数
- 采样率 sample_rate 44100 (CD)
- 通道 channels(左右声道)
- 样本大小(格式)sample_size
- AV_SAMPLE_FMT_S16
- AV_SAMPLE_FMT_FLTP
MP4格式分析
| box 类型 | 说明 | |||||
|---|---|---|---|---|---|---|
| ftyp | file type,表明文件类型 | |||||
| moov | metadata container,存放媒体信息的地方 | |||||
| mvhd | movie header,文件的总体信息,如时长,创建时间等 | |||||
| trak | track or stream container,存放视频/音频流的容量 | |||||
| tkhd | track header,track 的总体信息,如时长,宽高等 | |||||
| mdia | trak media information container | |||||
| mdhd | media header,定论 TimeScale,trak需要通过 TimeScale 换算成真实时间 | |||||
| hdlr | handler,表明本 trak 类型,指明是 video/audio 还是 hint | |||||
| minf | media information container,数据在子 box 中 | |||||
| stbl | sample table box,存放时间/偏移的映射关系表,数据在子 box中 | |||||
| stsd | sample descriptions | |||||
| stts | (decoding) time-to-sample,“时戳-sample 序号”的映射表 | |||||
| stsc | sample-to-chunk,sample 和 chunk 的映射表,这里的算法比较巧妙 | |||||
| stsz | sample size,每个 sample 的大小 | |||||
| stz2 | sample size,另一种 sample size 的存储算法,更节省空间 | |||||
| stss | sync sample table,可随机访问的 sample 列表(关键帧列表) | |||||
| stco | chunk offset,每个 chunk 的偏移,sample 的偏移可根据其它 box 推算出来 | |||||
| co64 | 64-bit chunk offset | |||||
| mdat | media data container,具体的媒体数据 | |||||
FFmpeg 日志系统
|
1 2 3 4 5 |
include <libavutil/log.h> // 设置日志级别 av_log_set_level(AV_LOG_DEBUG) // 打印日志 av_log(NULL, AV_LOG_INFO,"...%s\n",op) |
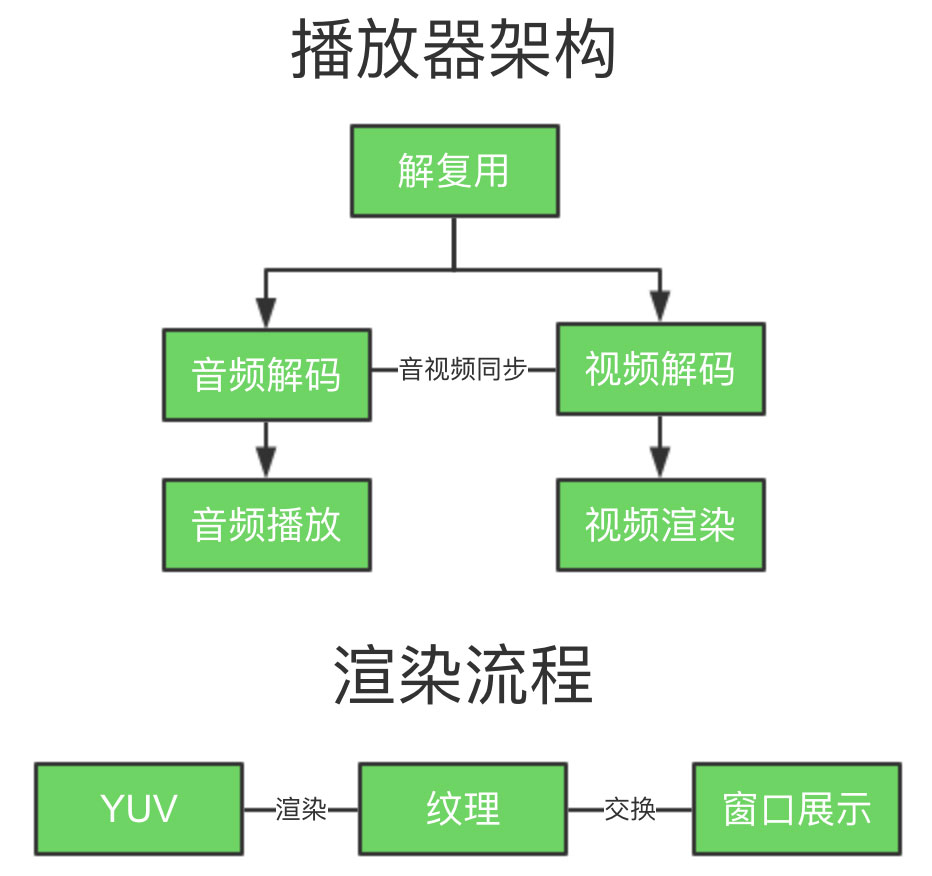
播放器架构 & 渲染流程
音视频解码由 FFmpeg 完成,播放、渲染由 SDL 实现
FFmpeg 从何而来?
- 2000年,由法布里斯•贝拉(Fabrice Bellard)创建
- 2004年,迈克尔(Michael Niedermayer)接管
- 2011年,Libav从 FFmpeg 分离
FFmpeg 是一个非常优秀的多媒体框架,可运行在 Linux、Windows和 Mac 平台上,能够解码、编码、转码、复用、解复用、过滤音视频数据。
本文主要内容
- FFmpeg常用命令实战
- FFmpeg开发必备C语言回顾
- FFmpeg多媒体文件处理
- FFmpeg编解码实战
- FFmpeg SDL音视频渲染实战
- FFmpeg播放器核心功能开发
- 如何在Android下使用FFmpeg
- 如何在iOS下使用FFmpeg
安装
GitHub 地址:https://github.com/FFmpeg/FFmpeg
|
1 2 3 4 5 6 7 8 9 10 11 12 |
git clone https://github.com/FFmpeg/FFmpeg.git cd FFmpeg ./configure --help ./configure --prefix=/usr/local/ffmpeg --enable-gpl --enable-nonfree --enable-libfdk-aac --enable-libx264 --enable-libx265 --enable-filter=delogo --enable-debug --disable-optimizations --enable-libspeex --enable-videotoolbox --enable-shared --enable-pthreads --enable-version3 --enable-hardcoded-tables --cc=clang --host-cflags= --host-ldflags=make && make install make && make install # Mac如若权限不足可使用 sudo make install 或使用 sudo -i 切换为root # 编译执行应使用软链确保可直接执行命令 ln -s /usr/local/ffmpeg/bin/ffmpeg /usr/local/bin/ ln -s /usr/local/ffmpeg/bin/ffplay /usr/local/bin/ # Linux 编译 ./configure --prefix=/usr/local/ffmpeg --enable-gpl --enable-nonfree --enable-libfdk-aac --enable-libx264 --enable-libx265 --enable-filter=delogo --enable-debug --disable-optimizations --enable-libspeex --enable-shared --enable-pthreads |
以上–enable-debug –disable-optimizations主要是便于开发调试,生产环境请勿使用
FFmpeg常用命令实战
基本信息查询命令
|
1 2 3 4 5 6 7 8 9 10 11 12 13 14 15 |
-version 显示版本 -demuxers 显示可用的 demuxers -muxers 显示可用的 muxers -devices 显示可用的设备 -codecs 显示所有编解码器 -decoders 显示可用的解码器 -encoders 显示所有的编码器 -bsfs 显示比特流 filter -formats 显示可用的格式 -protocols 显示可用的协议 -filters 显示可用的过滤器 -pix_fmts 显示可用的像素格式 -sample_fmts 显示可用的采样格式 -layouts 显示 channel 名称 -colors 显示识别的颜色名称 |
录制命令
|
1 2 3 4 5 6 7 8 9 10 11 12 13 14 |
# 录制视频 ffmpeg -f avfoundation -i 1 -r 30 out.yuv -f 指定使用 avfoundation 采集数据 -i 指定从哪儿采集数据,它是一个文件索引号[1] Capture screen 0 -r 指定帧率 # 查看录制音频、视频设备号 ffmpeg -f avfoundation -list_devices true -i "" # 根据录制时的分辨率和像素格式指定进行播放操作 # brew 安装的话请使用brew reinstall ffmpeg --with-sdl2安装 ffplay ffplay -video_size 2880x1800 -pixel_format uyvy422 out.yuv # 录制音频命令 ffmpeg -f avfoundation -i :1 out.wav ffplay out.wav :0 代表音频设备 |
参照如上命令在使用内置摄像头(-i 0)录制时会出现报错:
|
1 |
Selected pixel format (yuv420p) is not supported by the input device. |
修改命令如下:
|
1 2 |
ffmpeg -f avfoundation -video_size 1280x720 -framerate 30 -i 0 -r 30 out.yuv # 支持的尺寸有1280x720、640x480、320x240 # ffplay -video_size 1280x720 -pixel_format uyvy422 out.yuv |
分解/复用命令
|
1 2 3 4 5 6 7 8 9 |
# 多媒体格式转换 ffmpeg -i input.mp4 -vcodec copy -acodec copy out.flv -i 输入文件 -vcodec 视频编解码处理方式 -acodec 音频编解码处理方式 # 抽取视频 ffmpeg -i input.mov -an -vcodec copy out.h264 # 抽取音频(假设音频为 aac) ffmpeg -i input.mov -acodec copy -vn out.aac |
处理原始数据命令
|
1 2 3 4 5 6 7 8 |
# FFmpeg 提取 YUV 数据, -an 表示不带音频数据、-vn 表示不带视频数据 ffmpeg -i input.mp4 -an -c:v rawvideo -pix_fmt yuv420p out.yuv # FFmpeg 提取 PCM数据 ffmpeg -i input.mp4 -vn -ar 44100 -ac 2 -f s16le out.pcm -ar 中的 r 为 rate,即采样率 -ac 中的 c为 channel,下面为双声道 -f 格式 s16le 中 s 有符号,16位,le little end-小头,一种存储方式 # 播放:ffplay -ar 44100 -ac 2 -f s16le out.pcm |
裁剪与合并命令
|
1 2 3 4 5 6 7 8 9 |
# 视频裁切命令in_w-200表示原视频宽减200,同理in_h-200表示原视频的高减200 ffmpeg -i i.mov -vf crop=in_w-200:in_h-200 -c:v libx264 -c:a copy out.mp4 # 裁剪 ffmpeg -i input.mp4 -ss 00:00:00 -t 10 out.ts -ss 起始时间 -t 时长(秒) # 合并 ffmpeg -f concat -i inputs.txt out.flv # inputs.txt 的内容(filename 可以是1.ts 等),是一个待合并的文件列表 file filename |
图片/视频互转命令
|
1 2 3 4 5 6 7 |
ffmpeg -i in.flv -r 1 -f image2 image-%3d.jpeg -r 帧率,1为每秒一张 -f 图片格式 %3d 三个数字 # 图片转视频 ffmpeg -i image-%3d.jpeg out.mp4 |
直播相关命令
测试流地址链接:https://blog.csdn.net/github_30662571/article/details/72466091
|
1 2 3 4 5 |
# 直播推流 ffmpeg -re -i out.mp4 -c copy -f flv rtmp:server/live/streamName -re 减慢帧率速度,保持同步 # 直播拉流 ffmpeg -i rtmp://server/live/streamName -c copy dump.flv |
各种滤镜命令
|
1 2 3 |
# 裁切crop ffmpeg -i input.mov -vf crop=in_w-200:in_h-200 -c:v libx264 -c:a copy out.mp4 -200表示宽高分别减200 |
FFmpeg开发必备C语言回顾
演示代码: GitHub仓库
|
1 2 3 4 5 6 7 8 9 10 11 12 13 14 15 16 17 |
# helloworld.c #include <stdio.h> int main(int argc, char* argv[]) { int a=1; #变量 const int b=2; #常量 printf("a=%d\n",a); printf("Hello World!\n"); return 0; } # Mac 下编译 clang -g -o helloworld helloworld.c -g 调试信息 -o 输出文件 # Linux下使用的命令是 gcc |
常用基本类型
整型:short、int、long
浮点型:float、double
Char 型:char
无符号型:void
指针与数组
指针就是内存地址:void*、char*,指针本身也可进行运算
数组(连续同一类型):char c[2]、int arr[10]
|
1 2 3 4 5 6 7 8 9 10 11 12 13 14 15 16 17 18 19 20 21 22 23 24 25 |
include <stdio.h> #include <stdlib.h> int main(int argc, char *argv[]) { int *a, *b; a = (int*)malloc(sizeof(int)); b = (int*)malloc(sizeof(int)); *a = 1; *b = 2; int c[3] = {0,1,2}; // 加&符表示指针地址,指向存储空间地址 printf("addr of a:%p, %p, %d\n", &a, a, *a); printf("addr of b:%p, %p, %d\n", &b, b, *b); printf("addr of c:%p, %p, %d, %d, %d\n", &c, c, c[0], c[1], c[2]); return 0; } // 输出结果,注意数组的指针和存储空间地址相同 addr of a:0x7ffee6b95700, 0x7fbdc6402bf0, 1 addr of b:0x7ffee6b956f8, 0x7fbdc6402c00, 2 addr of c:0x7ffee6b9571c, 0x7ffee6b9571c, 0, 1, 2 |
结构体、枚举类型
|
1 2 3 4 5 6 |
// 结构体 struct st{ }; // 枚举类型 enum em{ }; |
|
1 2 3 4 5 6 7 8 9 10 11 12 13 14 15 16 17 18 |
int main(int argc, char* argv[]) { FILE* file; char buf[1024] = {0,}; // 打开文件 file = fopen("1.txt", "a+"); // 写入文件 fwrite("hello, world!", 1, 13, file); // 回到文件头 rewind(file); // 读取文件到 buffer 中 fread(buf,1,26,file); // 关闭文件 fclose(file); printf("buf:%s\n",buf); return 0; } |
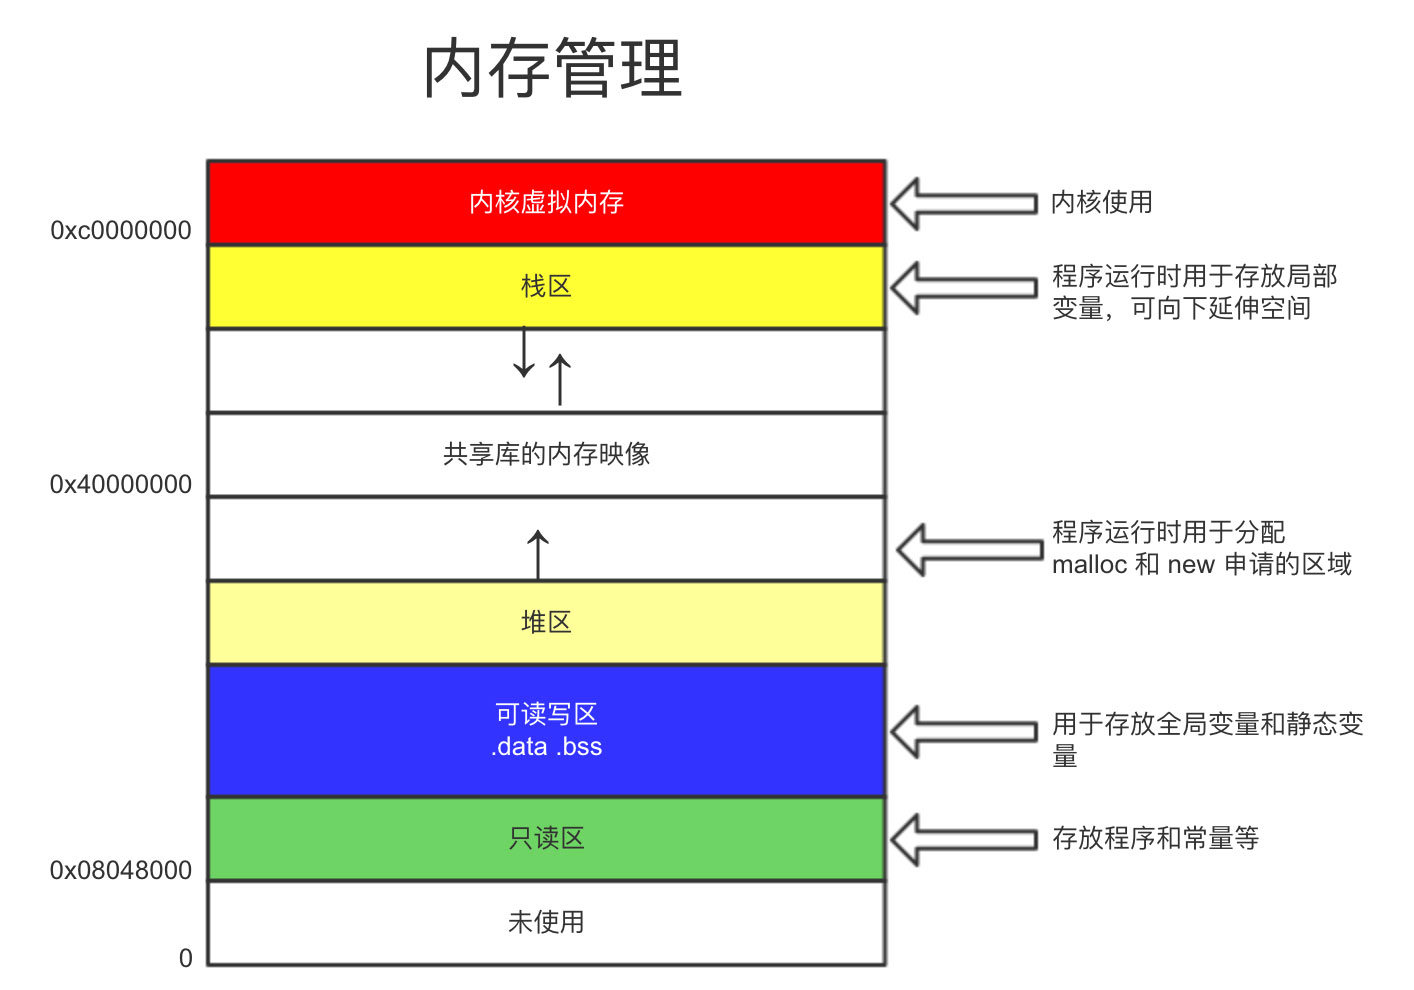
操作系统管理内存:栈空间(4M, 8M,操作系统自动分配)、堆空间(4G)、内存映射
|
1 2 3 4 5 6 7 8 9 10 11 12 13 14 15 16 |
int sum(int a, int b) { return(a+b); } int main(int argc, char* argv[]) { int result; // 指针函数 int(*f)(int, int); // 赋值为对就函数 f = sum; result = f(3,5); printf("3+5=%d\n",result); return result; } |
C语言编译器
|
1 2 3 4 5 6 7 8 9 10 11 12 13 14 15 16 17 |
gcc/clang -g -O2 -o test test.c -I... -L... -l -g 调试信息 -O 指令优化级别指定 -o 输出文件 -I 指定头文件位置 -L 指定所引用第三方库文件的位置 -l 具体使用的库 // 头文件 add.h // 仅编译为中间文件,生成的为 add.o 文件 clang -g -c add.c // 生成静态库 mylib libtool -static -o libmylib.a add.o # 编译文件 clang -g -o libtest libtest.c -I . -L . -lmylib |
预编译→编译→链接(动态链接 /静态链接)
调试器(gdb/lldb)
调试信息包含:指令地址、对应源代码及行号
|
1 2 3 4 5 6 7 8 9 10 11 12 |
lldb libtest b main # 为 main 函数设置断点 break list ... dwarfdump 读取.dSYM目录下文件如:libtest.dSYM/Contents/Resources/DWARF/libtest # 相关命令 b 设置断点 breakpoint r 运行程序 run n 单步执行 next s 跳入函数 step finish 跳出函数 p 打印内容 print |
FFmpeg多媒体文件处理
演示代码:GitHub 仓库
FFmpeg 代码结构
- libavcodec: 提供了一系列编解码器的实现
- libavformat: 实现在流协议,容器格式及其本IO访问
- libavutil: 包括了hash器,解码器和各利工具函数
- libavfilter: 提供了各种音视频过滤器
- libavdevice: 提供了访问捕获设备和回放设备的接口
- libswresample: 实现了混音和重采样
- libswscale: 实现了色彩转换和缩放工能
|
1 2 3 4 5 6 7 8 9 10 11 12 13 14 15 16 17 18 19 20 21 22 23 24 25 26 |
# FFmpeg日志系统 include <libavutil/log.h> // 设置日志级别:AV_LOG_ERROR,AV_LOG_WARNING,AV_LOG_INFO,AV_LOG_DEBUG av_log_set_level(AV_LOG_DEBUG> // 打印日志 av_log(NULL,AV_LOG_INFO,"...%s\n",op) # 编译语句 clang -g -o ffmpeg_log ffmpeg_log.c -lavutil # 文件的删除与重命名 avpriv_io_delete() avpriv_io_move() # 编译语句 clang -g -o ffmpeg_del ffmpeg_file.c `pkg-config --libs libavformat` # clang -g -o ffmpeg_del ffmpeg_file.c -lavformat # 操作目录的函数 avio_open_dir() avio_read_dir() avio_close_dir() AVIODirContext // 操作目录的上下文 AVIODirEntry // 目录项,用于存放文件名、文件大小等信息 # 编译语句: clang -g -o list ffmpeg_list.c `pkg-config --libs libavformat libavutil` # clang -o ffmpeg_list ffmpeg_list.c -lavformat -lavutil |
多媒体文件的基本概念
- 多媒体文件其实是个容器
- 在容器里有很多流(Stream/Track)
- 每种流是由不同的编码器编码的
- 从流中读出的数据称为包
- 在一个包中包含着一个或多个帧
几个重要的结构体
- AVFormatContext
- AVStream
- AVPacket
FFmpeg 操作流数据的基本步骤
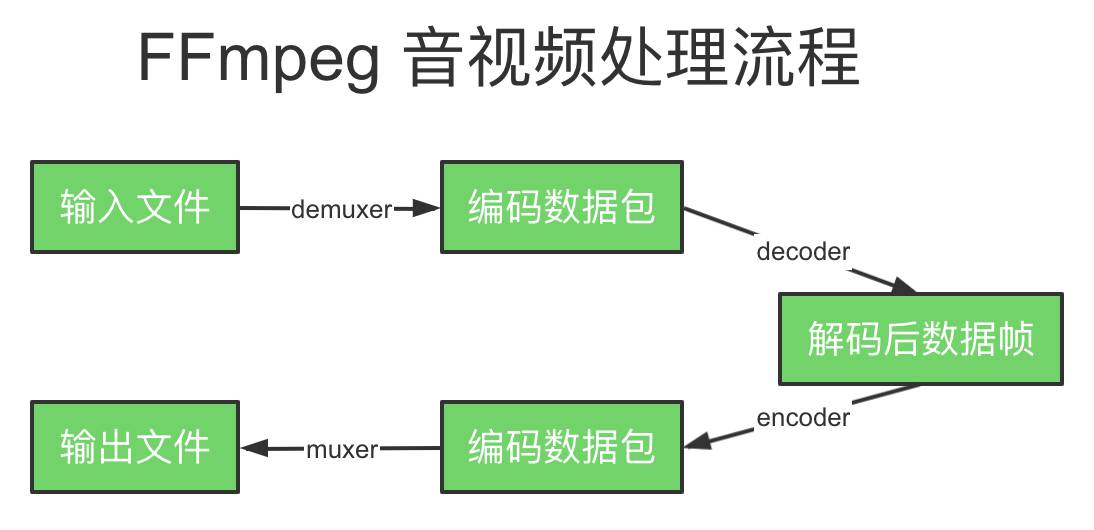
解复用➞获取流➞读数据包➞释放资源
打印音/视频信息
|
1 2 3 4 5 6 7 8 9 10 11 |
av_register_all(); // deprecated,新版本可不添加 # 兼容老版本 #if LIBAVCODEC_VERSION_INT < AV_VERSION_INT(58, 9, 100) av_register_all(); #endif avformat_open_input()/avformat_close_input() av_dump_format() # 编译命令 clang -g -o mediainfo media_info.c `pkg-config --libs libavutil libavformat` |
抽取音频数据
|
1 2 3 4 5 6 7 8 |
av_init_packet() // 初始化数据包结构体 av_find_best_stream() av_read_frame()/av_packet_unref() # 编译命令 clang -g -o extract_audio extract_audio.c `pkg-config --libs libavutil libavformat` # 提取音频 ./extract_audio test.mp4 ./test.aac |
抽取视频数据
◆Start code
◆SPS/PPS
◆codec→extradata
|
1 2 3 4 |
# 编译命令 clang -g -o extract_video extract_video.c `pkg-config --libs libavutil libavformat` # 抽取视频 ./extract_video test.mp4 test.h264 |
格式互转
- avformat_alloc_output_context2()/avformat_free_context()
- avformat_new_stream()
- avcodec_parameters_copy()
- avformat_write_header()
- av_write_frame()/av_interleaved_write_frame()
- av_write_trailer()
|
1 2 3 4 |
#编译命令 clang -g -o remuxing remuxing.c `pkg-config --libs libavformat` # mp4转 flv ./remuxing trailer.mp4 trailer.flv |
视频截取
av_seek_frame()
|
1 2 3 4 |
# 编译命令 clang -g -o cutvideo cutvideo.c `pkg-config --libs libavutil libavformat libavcodec` # 剪辑 ./cutvideo 10 20 trailer.mp4 trailer-cut.mp4 |
FFmpeg编解码实战
演示代码:GitHub 仓库
FFmpeg H264解码
libavcodec/avcodec.h
常用数据结构
- AVCodec 编码器结构体
- AVCodecContext 编码器上下文
- AVFrame 解码后的帧
结构体内存的分配与释放
- av_frame_alloc/av_frame_free()
- avcodec_alloc_context3()
- avcodec_free_context()
解码步骤
- 查找解码器(avcodec_find_decoder)
- 打开解码器(avcodec_open2)
- 解码(avcodec_decode_video2)
FFmpeg H264编码
H264编码流程
- 查找编码器(avcodec_find_encoder_by_name)
- 设置编码参数,并打开编码器(avcodec_open2)
- 编码(avcodec_encode_video2)
|
1 2 |
clang -g -o encode_video encode_video.c `pkg-config --libs libavcodec` ./encode_video 1.h264 libx264 |
实战-视频转图片
|
1 2 |
clang -g -o decode_video decode_video.c `pkg-config --libs libavformat libavcodec libavutil libswscale` ./decode_video /workspace/trailer.mp4 ./ |
FFmpeg AAC 编解码
- 查找编码器(avcodec_find_encoder_by_name)
- 设置编码参数,并打开编码器(avcodec_open2)
- 编码(avcodec_encode_audio2)
|
1 2 |
clang -g -o encode_audio encode_audio.c `pkg-config --libs libavcodec` ./encode_audio 2.aac |
FFmpeg SDL音视频渲染实战
演示代码:GitHub 仓库
SDL(Simple DirectMedia Layer),是由 C 语言实现的跨平台的媒体开源库,多用于开发游戏、模拟器、媒体播放器等多媒体应用领域。
http://www.libsdl.org/index.php
编译安装
|
1 2 3 4 |
# 下载源码进入目录编译安装 ./configure --prefix=/usr/local # -j 指定线程数 sudo make -j 8 && make install |
使用 SDL基本步骤
- 添加头文件#include <SDL.h>
- 初始化 SDL(SDL_Init)
- 退出 SDL(SDL_Quit)
SDL_CreateWindow()/SDL_DestroyWindow()
SDL_CreateRenderer()/SDL_DestroyRenderer()/SDL_RenderClear()/SDL_RenderPresent()
|
1 2 |
clang -g -o first_sdl first_sdl.c `pkg-config --cflags --libs sdl2` clang -g -o event_sdl event_sdl.c `pkg-config --cflags --libs sdl2` |
SDL将所有事件都存放在一个队列中;所有对事件的操作,其实就是对队列的操作。
SDL事件种类
- SDL_WindowEvent:窗口事件
- SDL_KeyboardEvent:键盘事件
- SDL_MouseMotionEvent:鼠标事件
事件处理:SDL_PollEvent(轮询), SDL_WaitEvent, SDL_WaitEventTimeout
SDL渲染基本原理
SDL纹理相关 API
- SDL_CreateTexture()
- format:YUV, RGB
- access: Texture 类型, Target, Stream
- SDL_DestroyTexture()
- SDL_SetRenderTarget()
- SDL_RenderClear()
- SDL_RenderCopy()
- SDL_RenderPresent()
|
1 |
clang -g -o texture_sdl texture_sdl.c `pkg-config --cflags --libs sdl2` |
YUV 视频播放器
创建线程
- SDL_CreateThread
- fn:线程执行函数
- name:线程名
- data:执行函数参数
SDL 更新纹理
- SDL_UpdateTexture()
- SDL_UpdateYUVTexture()
|
1 2 |
# 执行时需改代码中的宽高和 yuv 文件路径 clang -g -o yuv_player yuv_player.c `pkg-config --cflags --libs sdl2` |
SDL音频处理
播放音频基本流程:打开音频设备->设置音频参数->向声卡喂数据->播放音频->关闭设备
播放音频的基本原则
- 声卡向你要数据而不是你主动推给声卡
- 数据的多少由音频参数决定的
SDL 音频 API
- SDL_OpenAudio/SDL_CloseAudio
- SDL_PauseAudio
- SDL_MixAudio(混音)
|
1 |
clang -g -o pcm_player pcm_player.c `pkg-config --cflags --libs sdl2` |
FFmpeg播放器核心功能开发
演示代码:GitHub 仓库
最简单的播放器一
- 该播放器只实现视频播放
- 将 FFmpeg 与 SDL结合到一起
- 通过 FFmpeg 解码视频数据
- 通过 SDL 进行渲染
|
1 |
clang -g -o simple_player simple_player.c `pkg-config --cflags --libs sdl2 libavformat libavutil libswscale libavcodec` |
最简单的播放器二
- 可以同时播放音频与视频
- 使用队列存放音频包
|
1 |
clang -g -o simple_player2 simple_player2.c `pkg-config --cflags --libs sdl2 libavutil libavformat libavcodec libswscale libswresample` |
线程的互斥与同步:通过操作系统的锁与信号量
锁的种类:读写锁、自旋锁、可重入锁
SDL创建线程
- SDL_CreateThead
- SDL_WaitThread
SDL锁
- SDL_CreateMutex/SDL_DestroyMutex
- SDL_LockMutex/SDL_UnlockMutex
SDL条件变量(信号量)
- SDL_CreateCond/SDL_DestroyCond
- SDL_CondWait/SDL_CondSignal
参考教程:http://dranger.com/ffmpeg/tutorial04.html
|
1 |
clang -g -o player player.c `pkg-config --cflags --libs sdl2 libavutil libavformat libavcodec libswresample libswscale` |
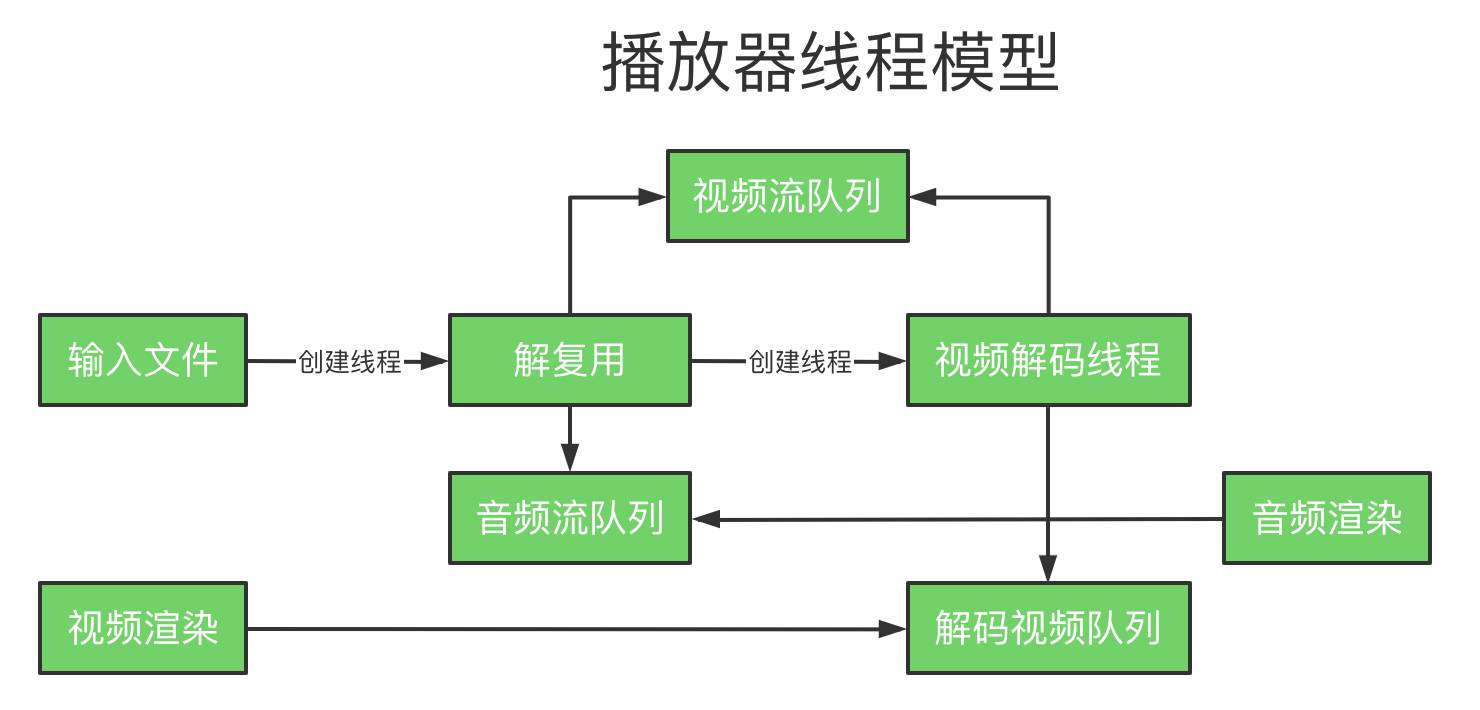
线程的退出机制
- 主线程接收到退出事件
- 解复用线程在循环分流时对 quit进行判断
- 视频解码线程从视频流队列中取包时对 quit进行判断
- 音频解码从音频流队列中取包时对 quit进行判断
- 音视频循环解码时对 quit 进行判断
- 在收到信号量消息时对 quit 进行判断
音视频同步
- 时间戳
- PTS: Presentation timestamp
- DTS: Decoding timestamp
- I (intra)/B (bidrectional)/P (predicted)帧
- 时间戳顺序
- 实际帧顺序:I B B P
- 存放帧顺序:I P B B
- 解码时间戳:1 4 2 3
- 展示时间戳:1 2 3 4
- 从哪儿获得 PTS
- AVPacket 中的 PTS
- AVFrame 中的 PTS
- av_frame_get_best_effort_timestamp()
- 时间基
- tbr:帧率(time base rate)
- tbn:time base of stream
- tbc:time base of codec
- 计算当前帧的PTS
- PTS = PTS * av_q2d(video_stream->time_base)
- av_q2d(AVRotional a)
{ return a.num / (double)a.den;}
- 计算下一帧的PTS
- video_clock:预测的下一帧视频的 PTS
- frame_delay:1/tbr
- audio_clock:音频当前播放的时间戳
- 音视频同步方式
- 视频同步到音频
- 音频同步到视频
- 音频和视频都同步到系统时钟
- 视频播放的基本思路:一般的做法,展示第一帧视频帧后,获得要显示的下一个视频帧的 PTS,然后设置一个定时器,当定时器超时后,刷新新的视频帧,如此反复操作。
如何在Android下使用FFmpeg
- JAVA与 C 之间的相互调用
- Android 下的 FFmpeg的编译
- Android 下如何使用 FFmpeg
JNI基本概念
- JNIEnv
- JavaVM
- 线程
安卓投屏至电脑:https://www.vysor.io/
JAVA 调用 C、C++的方法
- 在 Java 层定义 native关键字函数
- 方法一:在 C/C++层创建 Java_packname_classname_methodname 函数
- 方法二:RegisterNative
1234567typedef struct{const char* name;const char* signature;void* fnPtr;}JNINativeMethod;// 注册 Native 方法的最佳时机:jint JNI_OnLoad(JavaVM *vm, void* reserved)// jint JNI_OnUnload(JavaVM *vm, void* reserved)
Signature
- Java 与 C/C++相互调用时,表示函数参数的描述符
- 输入参数放在( )内,输出参数放在( )外
- 多个参数之间顺序存放,且用“;”分割
原始类型的 Signature
| Java 类型 | 符号 |
|---|---|
| boolean | Z |
| byte | B |
| char | C |
| short | S |
| int | I |
| long | L |
| float | F |
| double | D |
| void | V |
类的 Signature
- Java 对象参数“L包路径/类名”
- Java 数组“[”,
- 例
- ([Student;)[Lstudent; -> Student[] Xxx(Student[])
- ([Ljava/lang/String;)[Ljava/lang/Object -> Object[] Xxx(String[] s)
参考代码FirstJNI:GitHub仓库
C/C++调Java 方法
- FindClass
- GetMethodID/GetFieldID
- NewObject
- Call<TYPE> Method/[G/S]et<Type> Field
参考代码testc2j:GitHub仓库
安卓下使用 FFmpeg(需修改MainActivity中的videoPath):GitHub仓库
如何在iOS下使用FFmpeg
参考代码:GitHub 仓库
https://github.com/Bilibili/ijkplayer
音视频进阶
- FFmpeg Filter 的使用与开发
- FFmpeg 裁剪与优化
- 视频渲染(OpenGL/Metal)
- 声音的特效
- 网络传输
- WebRTC
- AR技术
- OpenCV
行业痛点
- 回音消除
- 降噪
- 视频秒开
- 多人多视频实时互动
- PC 端/APP/网页实时视频互通
- 实时互动与大并发负载
常见问题
1、nasm/yasm not found or too old. Use –disable-x86asm for a crippled build.
|
1 2 3 4 5 |
# 访问http://www.tortall.net/projects/yasm/releases/下载最新版本 http://www.tortall.net/projects/yasm/releases/yasm-1.3.0.tar.gz #解压进入到文件夹 ./configure make && make install |
2、ERROR: libfdk_aac not found
|
1 2 3 4 5 6 |
git clone git://github.com/mstorsjo/fdk-aac cd fdk-aac autoreconf -i ./configure make install # 或 https://sourceforge.net/projects/opencore-amr/files/fdk-aac/下载编译安装 |
3、warning: ‘av_register_all’ is deprecated
修改为:
|
1 2 3 |
#if LIBAVCODEC_VERSION_INT < AV_VERSION_INT(58, 9, 100) av_register_all(); #endif |
4、MacOS Mojave ffplay 只播放声音不显示画面
解决办法:

