虚拟环境的搭建可参见Django环境搭建及开发
正则表达式知识参见【转载】Python正则表达式指南
正则表达式中匹配中文
|
1 |
[\u4E00-\u9FA5] |
前置知识
技术选型(Scrapy vs. Requests+BeautifulSoup
1、Requests 和 BeautifulSoup 都是库,Scrapy 是框架
2、Scrapy 框架中可以加入 Requests 和 BeautifulSoup
3、Scrapy 基于 Twisted,性能是最大的优势
4、Scrapy 方便扩展,提供了很多内置的功能
5、Scrapy 内置的 CSS 和 XPath Selector 非常方便,BeautifulSoup 最大的缺点就是慢
爬虫的作用
1、搜索引擎—百度、Google、垂直领域搜索引擎
2、推荐引擎—今日头条
3、机器学习的数据样本
4、数据分析(如金融数据分析、舆情分析等)
深度优先和广度优先
代码演示深度优先
|
1 2 3 4 5 6 7 |
def depth_tree(tree_node): if tree_node is not None: print(tree_node._data) if tree_node._left is not None: return depth_tree(tree_node._left) if tree_node._right is not None: return depth_tree(tree_node._right) |
代码演示广度优先
|
1 2 3 4 5 6 7 8 9 10 11 12 13 |
def level_queue(root): if root is None: return my_queue = [] node = root my_queue.append(node) while my_queue: node = my_queue.pop(0) print(node.elem) if node.lchild is not None: my_queue.append(node.lchild) if node.rchild is not None: my_queue.append(node.rchild) |
爬虫去重策略
1、将访问过的 url 保存到数据库中
2、将访问过的 url 保存到 set中,只需 o(1)的代价就可以查询 url
100,000,000*2byte*50个字符/1024/1024/1024 = 9G (假定每个 url是50个字符,可看到缺点是占用内存较高)
3、url 经过 MD5等方法哈希后保存到 set 中(Scrapy 默认使用方法)
4、用 bitmap 方法,将访问过的 url 通过 hash函数映射到某一位(缺点是冲突较高)
5、BloomFilter 方法对 bitmap 进行改进,多重 hash 函数降低冲突
环境准备(Mac)
Windows可下载cmder来使用常用的Linux命令
|
1 2 3 |
brew install python35 mkvirtualenv --python=/usr/local/Cellar/python35/3.5.2/bin/python3 env pip install -i https://pypi.doubanio.com/simple/ scrapy |
项目搭建
|
1 2 3 4 5 6 7 8 9 10 11 12 13 14 15 16 17 18 19 20 21 22 23 24 |
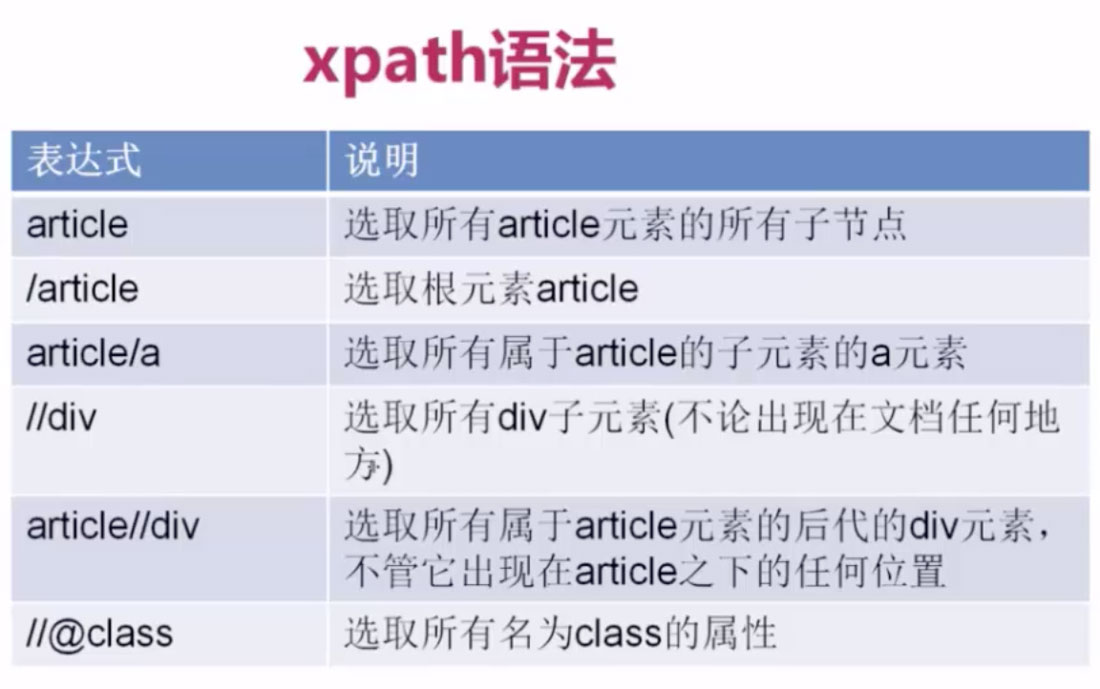
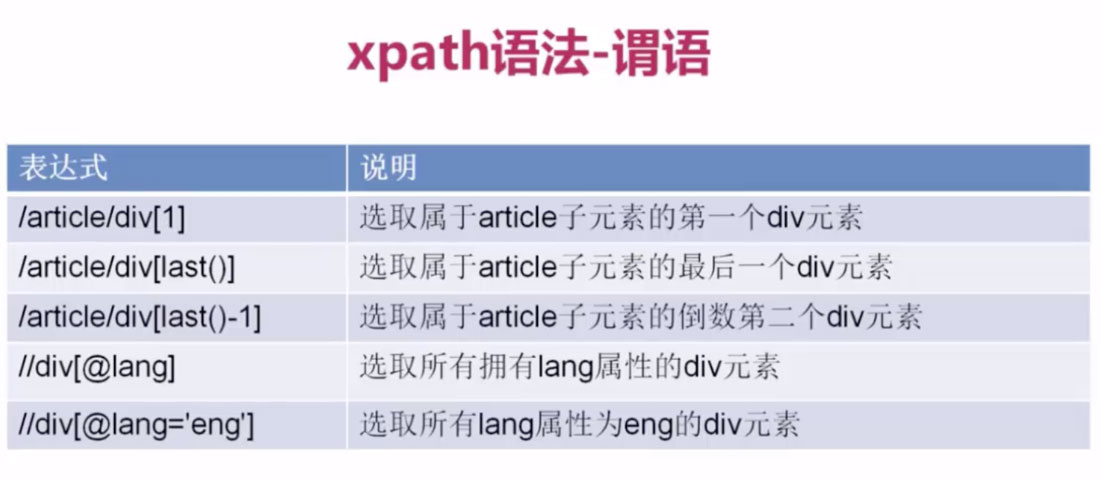
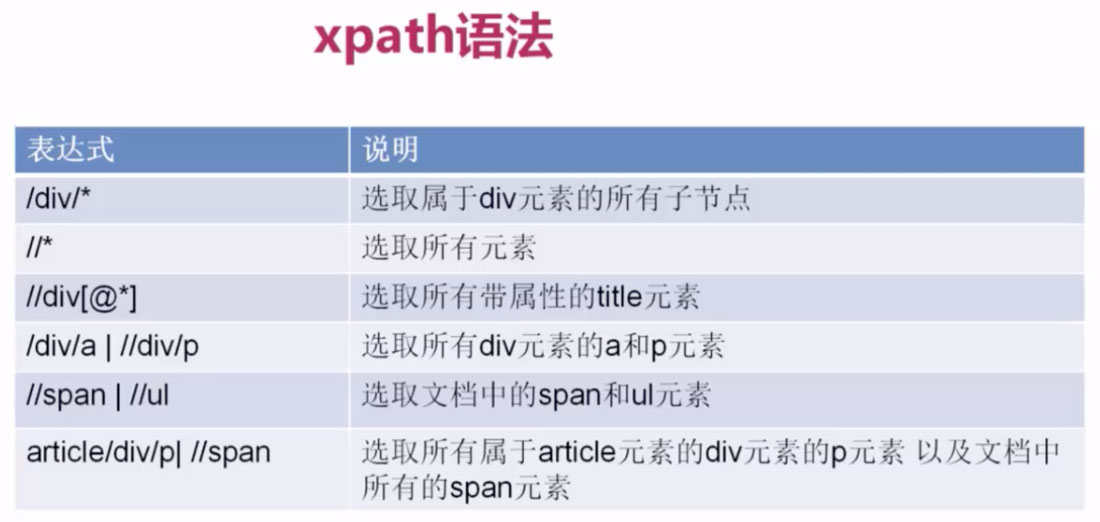
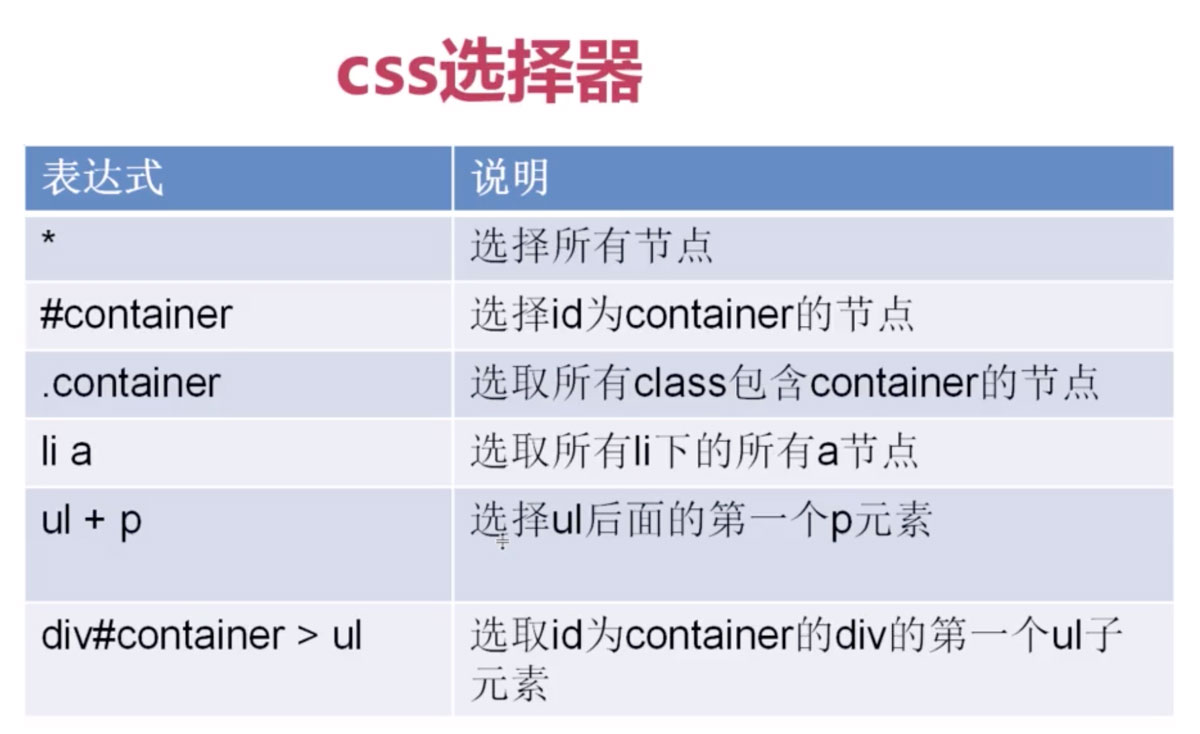
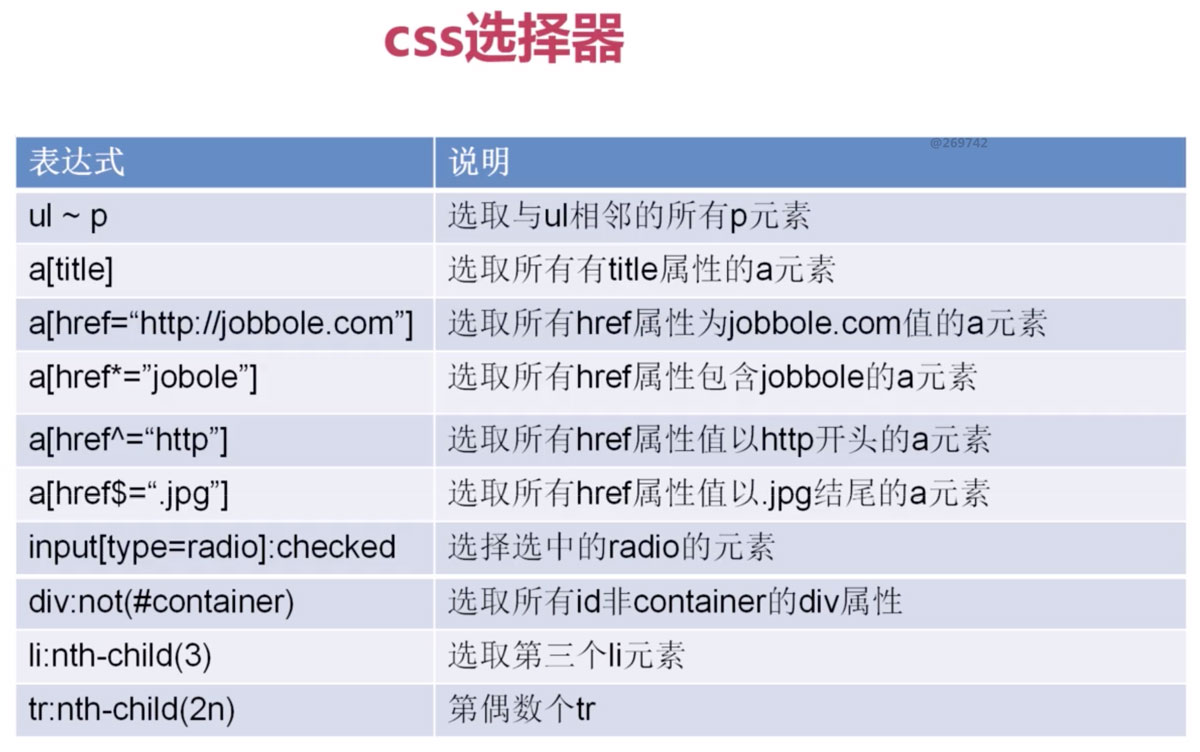
workon env scrapy startproject ProjectName cd ProjectName # 查看可用模板 scrapy genspider --list # 爬虫文件创建, -t指定模板类型,默认为basic,常用的还有crawl scrapy genspider (-t basic) example example.com # 命令行测试 scrapy crawl example # 根目录下新建main.py from scrapy.cmdline import execute import sys, os sys.path.append(os.path.dirname(os.path.abspath(__file__))) execute(["scrapy", "crawl", "spider_name"]) # 命令行调试 scrapy shell http://www.example.com # 添加 User Agent 使用 # xpath示例(取第一个元素用extract_first()替代extract()[0]可节省异常处理) response.xpath('//div[@class="entry-header"]/h1/text()').extract_first() # 如元素包含多个class response.xpath('//div[contains(@class,"entry-header")]/h1/text()').extract_first() response.css(".entry-header h1::text").extract()[0] |
注:在PyCharm中编写代码时需访问Preferences > Project Interpreter选择所创建的env环境
|
1 2 3 4 5 6 7 8 9 10 11 12 13 14 15 16 17 18 19 20 21 22 23 24 25 26 27 28 29 30 31 32 33 34 35 36 37 38 39 40 41 42 43 44 45 |
# jobbole.py class JobboleSpider(scrapy.Spider): name = 'jobbole' allowed_domains = ['blog.jobbole.com'] start_urls = ['http://blog.jobbole.com/all-posts/'] def parse(self, response): """ 1、获取文章列表页中的文章 URL并交给 Scrapy 下载及解析函数进行具体字段的解析 2、获取下一页的 URL 并交给 Scrapy 进行下载,下载完成后交给 parse """ post_nodes = response.css('#archive .floated-thumb .post-thumb a') for post_node in post_nodes: image_url = post_node.css("img::attr(src)").extract_first("") post_url = post_node.css("::attr(href)").extract_first("") # Request(url=parse.urljoin(response.url, post_url), callback=self.parse_detail) yield Request(url=post_url, meta={"cover_img_url":parse.urljoin(response.url, image_url)}, callback=self.parse_detail) # 提取下一页并交给 Scrapy 进行下载 next_url = response.css('.next.page_numbers::attr(href)').extract_first("") if next_url: yield Request(url=next_url, callback=self.parse) def parse_detail(self,response): # 实例化一个 item 填充数据 article_item = JobBoleArticleItem() # 提取文章的具体字段 title = response.xpath('//div[@class="entry-header"]/h1/text()').extract_first() article_item["title"] = title # 传递到 Pipeline yield article_item # items.py class JobBoleArticleItem(scrapy.Item): # 创建字段,类似 Django 的 model,无需选择 Field 类型 title = scrapy.Field() # 取消ITEM_PIPELINES部分的注释 # pipelines.py # 继承 ImagesPipeline 存储图片路径(需更改 settings 中的 pipeline 配置) class ArticleImagePipeline(ImagesPipeline): def item_completed(self, results, item, info): for ok, value in results: image_file_path = value["path"] item["cover_image_url"] = image_file_path return item |
扩展知识:采用 Django 的 ORM 存储字段:scrapy-djangoitem
Settings.py
|
1 2 3 4 5 6 7 8 9 10 11 12 13 14 15 16 17 18 19 20 21 22 23 24 25 26 27 28 29 30 31 32 33 34 35 36 37 38 39 |
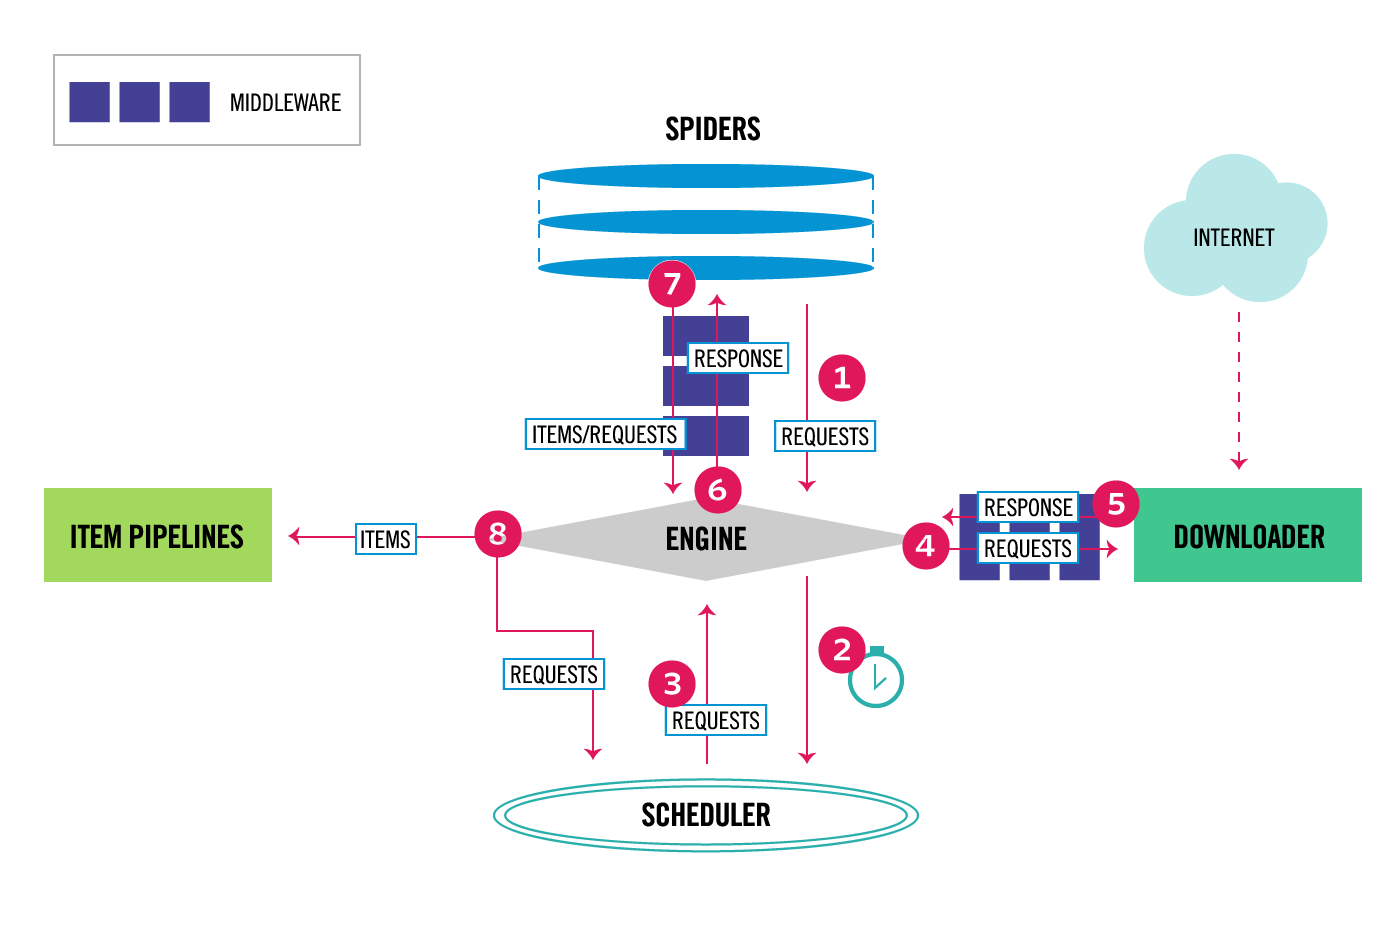
# 不遵循robots.txt的配置 ROBOTSTXT_OBEY = False # 是否使用 Cookies COOKIES_ENABLED = False ITEM_PIPELINES = { ... ... # 设置图片需下载,数字表示管道执行顺序 'scrapy.pipelines.images.ImagesPipeline': 1 } # 指定需下载图片 IMAGES_URLS_FIELD = "cover_img_url" # 获取当前绝对路径 project_dir = os.path.abspath(os.path.dirname(__file__)) # 下载图片存储路径 IMAGES_STORE = os.path.join(project_dir, 'images') # 下载图片最小高度 IMAGES_MIN_HEIGHT = 100 # 下载图片最小宽度 IMAGES_MIN_WIDTH = 100 # Scrapy 的暂停和重启,可自定义文件夹,一个目录保存一个状态,执行同一个目录会从上一次结束的地方重新执行 JOBDIR = "job_info/001" # 命令行实现暂停和重启 scrapy crawl lagou -s JOBDIR=job_info/001 # class 内部实现暂停和重启 custom_settings = { JOBDIR = "job_info/001" } # 参见文首的 Scrapy 架构图发现有两处 Middleware # 对应配置文件中的DOWNLOADER_MIDDLEWARES 和 SPIDER_MIDDLEWARES # DOWNLOADER_MIDDLEWARES可用于配置 User-Agent 等信息 # 在 Settings 文件中配置USER_AGENT也会替换掉默认的 Scrapy,参见scrapy/downloadermiddlewares/useragent.py # 对不同爬虫采取不同的配置可使用 custom_settings custom_settings = { "COOKIES_ENABLED": True } |
异步数据库存储
|
1 2 3 4 5 6 7 8 9 10 11 12 13 14 15 16 17 18 19 20 21 22 23 24 25 26 27 28 29 30 31 32 33 34 35 36 37 |
class MysqlTwistedPipeline(object): # 异步机制写入 MySQL def __init__(self, dbpool): self.dbpool = dbpool @classmethod def from_settings(cls, settings): # 读取 settings.py 配置置 dbparams = dict( host=settings["MYSQL_HOST"], db=settings["MYSQL_DBNAME"], user=settings["MYSQL_USER"], passwd=settings["MYSQL_PASSWORD"], charset='utf8', cursorclass=MySQLdb.cursors.DictCursor, use_unicode=True ) dbpool = adbapi.ConnectionPool("MySQLdb", **dbparams) return cls(dbpool) def process_item(self, item, spider): # 使用 Twisted 将 MySQL 插入变成异步执行 query = self.dbpool.runInteraction(self.do_insert, item) query.addErrback(self.handle_error, item, spider) # 处理异常 def handle_error(self, failure, item, spider): # 处理异步插入的异常 print(failure) def do_insert(self, cursor, item): # 执行插入操作 insert_sql = """ INSERT INTO jobbole_article (title) VALUES (%s) """ cursor.execute(insert_sql, (item["title"],)) |
使用 Item Loader
|
1 2 3 4 5 6 7 8 9 10 11 12 13 14 15 16 17 18 19 20 21 22 23 24 |
# items.py class ArticleItemLoader(ItemLoader): # 自定义 ItemLoader 只取数组的第一个元素 default_output_processor = TakeFirst() class JobBoleArticleItem(scrapy.Item): title = scrapy.Field() create_date = scrapy.Field( # MapCompose 中传入数据处理函数 input_processor = MapCompose(date_convert), # output_processor = TakeFirst() ) # jobbole.py class JobboleSpider(scrapy.Spider): def parse_detail(self,response): # 通过item loader 加载 item # item_loader = ItemLoader(item=JobBoleArticleItem(), response=response) cover_image_url = response.meta.get("cover_img_url", "") item_loader = ArticleItemLoader(item=JobBoleArticleItem(), response=response) item_loader.add_css("title", ".entry-header h1::text") # item_loader.add_xpath("title", '//div[@class="entry-header"]/h1/text()') item_loader.add_value("url", response.url) |
IP代理
scrapy-crawlera (官方收费)
验证码
编码实现(tesseract-ocr):识别率低
云打码(如http://yundama.com/)
在线打码
Selenium
Chomedriver完整版本下载:http://chromedriver.chromium.org/downloads
|
1 2 3 4 5 6 7 8 9 10 11 12 13 |
from selenium import webdriver from scrapy.selector import Selector # 根据具体情况修改路径 browser = webdriver.Chrome(executable_path="/Applications/chromedriver") # 通过浏览器访问链接 browser.get("https://xxx") # 将 Selenium 读取的源码转化为 Scrapy Selector,Scrapy 的 lxml 由 C 语言书写,执行效率更高 t_selector = Selector(text=browser.page_source) print(t_selector.css(".xxx::text").extract()) # browser.find_element_by_css_selector() # 退出浏览器 browser.quit() |
很多网站对于 Selenium都有相应的检测,执行以下操作可进行一定程度的防止:
1、去除 cdc 检查(以下 chg为随机选择的字符串):
|
1 2 3 4 |
vi /path/to/chromedriver # 按下Shift+: # 输入%s/cdc_/chg_/g回车 # 输入 wq 保存退出 |
2、 设置为开发者模式,防止被各大网站通过console 中打印windows.navigator.webdriver为 True识别出使用了Selenium
|
1 2 3 |
options = webdriver.ChromeOptions() options.add_experimental_option('excludeSwitches', ['enable-automation']) self.browser = webdriver.Chrome(executable_path=/path/to/chromedriver, options=options) |
3、直接使用老版本 Chrome(60)+Chromedriver(2.33)
4、使用命令行打开 Chrome(需关闭已打开的 Chrome)
|
1 2 3 4 5 6 7 8 9 10 |
/Applications/Google\ Chrome.app/Contents/MacOS/Google\ Chrome --remote-debugging-port=9000 # 检验方法:看以下路径是否能访问 http://127.0.0.1:9000/json # 再在爬虫中使用 from selenium.webdriver.chrome.options import Options chrome_option = Options() chrome_option.add_argument("--disable-extensions") chrome_option.add_experimental_option("debuggerAddress", "127.0.0.1:9000") browser = webdriver.Chrome(executable_path="/path/to/chromedriver", chrome_options=chrome_option) |
清除 input中的内容
网上有大量的用户反馈 Selenium 的 clear 方法是无法使用的,因此产生了很多替代方法,如使用 send_keys(Keys.CONTROL + “a”)先让其全选再输入,但对应的将其修改为 COMMAND 在 Mac 上亲测并不可用。
甚至 GitHub 上还有说获取其中值的长度再执行Keys.BACKSPACE或 Keys.DELETE,这里测试点击事件接 这两者均未见效果,到是Keys.ARROW_LEFT可以使用,因此如果获取长度再执行向左方向键似乎也是一种方案。
最终 Alan 选择的是通过双击事件进行全选,相关代码片断如下:
|
1 2 3 4 5 6 |
from selenium.webdriver import ActionChains user_element = browser.find_element_by_css_selector(".SignFlow-accountInput.Input-wrapper input") action_chains = ActionChains(browser) action_chains.double_click(user_element).perform() user_element.send_keys("xxxx") |
鼠标点击模拟
|
1 2 3 4 5 6 7 8 |
# Windows:pip install mouse #跨平台: pip install PyUserInput m = PyMouse() m.click(x, y, 1) k = PyKeyboard() k.press_key('H') |
MacOS 上捕捉屏幕上的坐标位置直接使用 Cmd+Shift+4即可
Linux上无图形界面使用浏览器的解决方案
|
1 2 3 4 5 6 7 8 9 |
# pip install pyvirtualdisplay from pyvirtualdisplay import Display display = Display(visible=0, size=(800, 600)) display.start() browser = webdriver.Chrome(xxx) ... # OSError=[Errno 2] No such file or directory: 'Xvfb' # sudo apt-get install xvfb |
PhantomJS, Scrapy Splash, Selenium Grid
Elasticsearch
Elasticsearch, Solr, Sphinx
关系型数据库搜索缺点
- 无法打分
- 无分布式
- 无法解析搜索请求
- 效率低
- 分词
安装elasticsearch-rtf(已安装各种插件的版本)
https://github.com/medcl/elasticsearch-rtf
https://elasticsearch.cn/article/6149
打分技术 TF-IDF
head 插件和 Kibana的安装
https://github.com/mobz/elasticsearch-head
连接需先配置 Elaticsearch(config/elasticsearch.yml)允许外部访问
|
1 2 3 4 |
http.cors.enabled: true http.cors.allow-origin: "*" http.cors.allow-methods: OPTIONS, HEAD, GET, POST, PUT, DELETE http.cors.allow-headers: "X-Requested-With, Content-Type, Content-Length, X-User" |
Kibana 应注意与 Elasticsearch 版本需要匹配
将 Scrapy 数据导致 Elasticsearch
https://github.com/elastic/elasticsearch-dsl-py
|
1 |
pip install elasticsearch-dsl |
Completion Suggester 自动补全接口
部署 Scrapy: https://github.com/scrapy/scrapyd
|
1 2 3 |
pip install scrapyd-client # 需编辑 scrapy.cfg(以下 xx 为该文件中对 deploy 的命名) scrapy-deploy xx -p ProjectName |
常见问题
1.libxml2.2.dylib provides version 10.0.0
|
1 2 3 4 5 6 7 |
# 报错内容 Reason: Incompatible library version: etree.cpython-35m-darwin.so requires version 12.0.0 or later, but libxml2.2.dylib provides version 10.0.0 # 解决方法 brew install libxml2 brew link --force libxml2 echo 'export PATH="/usr/local/opt/libxml2/bin:$PATH"' ~/.bash_profile |
2.ImportError No module named ‘win32api’
|
1 |
pip install -i https://pypi.doubanio.com/simple/ pypiwin32 |
3.ImportError: No module named ‘_sqlite3’
方法一:使用homebrew安装或升级python到3.6版本: brew install python3
方法二:使用anaconda新建环境, 点此参考
4.ValueError: Missing scheme in request url: h
|
1 2 |
raise ValueError('Missing scheme in request url: %s' % self._url) ValueError: Missing scheme in request url: h |
此处是由于默认会将IMAGES_URLS_FIELD配置的图片链接作为数组来处理,因此将传入的值改成数组即可,如
|
1 2 3 |
article_item["front_img_url"] = front_img_url 修改为 article_item["front_img_url"] = [front_img_url] |
5.TypeError: Unicode-objects must be encoded before hashing
对相应的值进行编码
|
1 |
xxx..encode("utf-8") |
6.Scrapy shell如何添加headers
当前很多网站都在反爬机制,其中一个就是对header进行判断,那么使用Scrapy Shell时要如何添加header信息呢?
|
1 2 3 4 5 6 7 |
# 方法一 scrapy shell -s USER_AGENT="" http://www.example.com # 方法二 scrapy shell from scrapy import Request req = Request("http://www.example.com", headers={"User-Agent": "..."}) fetch(req) |
7. User Agent
|
1 2 3 |
pip install fake-useragent # 通过源码查看: https://fake-useragent.herokuapp.com/browsers/{version} # 其中版本号可替换,如当前版本为0.1.11 |
8. no module named win32API
|
1 |
pip install pypiwin32 |

