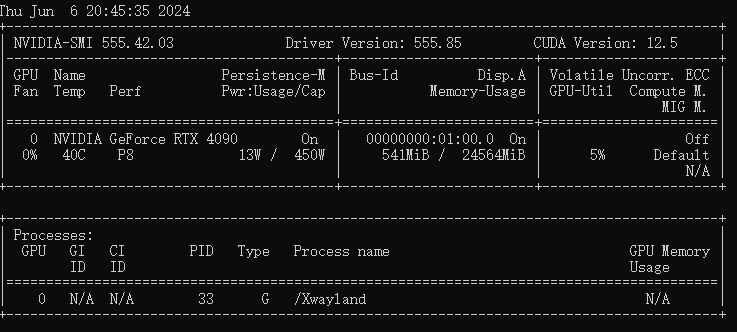
很多年没使用Windows了,这次组装了一个台式机,主要是为了能使用Nvidia的4090显卡,虽然可以做双系统,但简单使用下来发现WSL配合VScode使用也不错,先看看有哪些坑吧。
PyTorch安装
|
1 |
pip install torch torchvision torchaudio --extra-index-url https://download.pytorch.org/whl/cu121 |
1. CategoryInfo : SecurityError: (:) [],PSSecurityException
|
1 |
Set-ExecutionPolicy -ExecutionPolicy RemoteSigned -Scope CurrentUser |
2.Miniconda下载:https://mirrors.tuna.tsinghua.edu.cn/anaconda/miniconda/
设置镜像源:
|
1 |
pip config set global.index-url https://pypi.tuna.tsinghua.edu.cn/simple/ |
3.推荐版本为Python 3.10,最新的Python版本会出现一些难以debug的错误,比如stable-diffusion-webui即使安装了Rust也会报ERROR: Failed building wheel for tokenizers
4.指定Python版本
|
1 |
conda create -n envname python=3.10 |
5.默认wsl --install会将系统安装到C盘,将WSL迁移到D盘:
|
1 2 3 4 5 6 7 8 9 10 11 12 13 14 15 |
# 查询 wsl --list -v # 若在运行中需要终止服务 wsl -t Ubuntu-24.04 # 导出到指定文件夹,如将Ubuntu-24.04导出到D:\wsl_export\ubuntu-ex.tar wsl --export Ubuntu-24.04 "D:\wsl_export\ubuntu-ex.tar" # 删除原有WSL wsl --unregister Ubuntu-24.04 # 导入到新文件夹并重新注册服务 wsl --import Ubuntu-24.04 "D:\wsl\ubuntu" "D:\wsl_export\ubuntu-ex.tar" |
6.查看Nvidia显卡实时数据watch -n 1 nvidia-smi
7.Setting pad_token_id to eos_token_id:50256 for open-end generation.
将model修改为正在使用的模型,如gpt2
|
1 2 3 |
model.generation_config.pad_token_id = tokenizer.pad_token_id # 或 model.generate(**encoded_input, pad_token_id=tokenizer.eos_token_id) |
8.401 Client Error: Unauthorized for url: https://huggingface.co/api/repos/create
|
1 2 3 |
# !pip install ipywidgets from huggingface_hub import notebook_login notebook_login() |
9.PackageNotFoundError: No package metadata was found for bitsandbyte
|
1 |
!pip install bitsandbytes |
10.Make sure to have access to it at https://huggingface.co/mistralai/Mistral-7B-v0.1
需要在相应页面同意使用协议并在命令行登录
11.The load_in_4bit and load_in_8bit arguments are deprecated and will be removed in the future versions. Please, pass a BitsAndBytesConfig object in quantization_config argument instead.
|
1 2 3 4 5 6 |
quantization_config = BitsAndBytesConfig(load_in_4bit=True) AutoModelForCausalLM.from_pretrained( ... quantization_config=quantization_config, ... ) |
12.WSL局域网访问
|
1 2 3 4 5 6 7 |
# wsl主机查询IP地址 ip addr show eth0 | grep "inet\b" | awk '{print $2}' | cut -d/ -f1 # powershell netsh interface portproxy add v4tov4 listenport=<yourPortToForward> listenaddress=0.0.0.0 connectport=<yourPortToConnectToInWSL> connectaddress=(wsl hostname -I) netsh interface portproxy show all # 查看 netsh interface portproxy delete v4tov4 listenport=xxx listenaddress=0.0.0.0 # 删除 |
此时在本机上可通过局域网IP 访问,但其它主机依然无法使用,需要进入Windows Defender 防火墙,点击高级设置>入站规则>新建规则,按照向导添加允许访问的端口。
13.MissingCUDAException(“CUDA_HOME does not exist, unable to compile CUDA op(s)”)
|
1 |
apt install nvidia-cuda-toolkit |
14.运行 streamer-sale报错:AttributeError: ‘NoneType’ object has no attribute ‘seek’.
|
1 |
apt install unzip |
15.WSL 2 VSCode Vue热更新失效,修改package.json中的scripts:
|
1 |
"dev": "export CHOKIDAR_USEPOLLING=true && vite", |
16.ExecutableNotFound: failed to execute PosixPath(‘dot’), make sure the Graphviz executables are on your systems’ PATH
在使用conda时通过pip install graphviz发现依然报错,应执行如下命令:
|
1 |
conda install python-graphviz |
17.安装MaxKB时报错:django.db.utils.ProgrammingError: type “vector” does not exist,开发环境我们使用Docker安装,官方默认的不带有vector扩展,可使用
|
1 |
docker run --name postgres-vector -p 5432:5432 -e POSTGRES_PASSWORD=postgres -d pgvector/pgvector:pg16 |
注:出于某种原因该镜像并没有打latest标签,所以docker pull pgvector/pgvector会提示找不到镜像。
然后进入psql,执行:
|
1 2 |
\c maxkb或你自己的数据库名称 CREATE EXTENSION "vector"; |
18.pip缓存目录修改,默认pip的缓存目录位于C:\Users\<用户名>\AppData\Local\pip\cache,如果通过pip config set global.cache-dir xxx命令来设置所希望修改的位置,也可以直接修改 C:\Users\<用户名>\AppData\Roaming\pip\pip.ini配置文件。
19.AttributeError: module ‘google.protobuf.symbol_database’ has no attribute ‘Default’
检查下Tensorflow(GitHub中对应的tag下找requirements_lock文件)所指定的protobuf版本,按指定版本进行安装,如:
|
1 |
pip install protobuf==4.25.3 |
20.VS code隐藏pycache文件夹,使用快捷键ctrl+逗号(,),然后搜索exclude,添加一条**/__pycache__
21.本地Weaviate
|
1 |
docker run -p 8080:8080 -p 50051:50051 --name weaviate-dev -e AUTHENTICATION=api_key -e APIKEY=WVxxxx -d cr.weaviate.io/semitechnologies/weaviate:1.28.3 |
22.ERROR: Cannot install langchain-huggingface because these package versions have conflicting dependencies.
当前Python 3.13存在冲突问题,可使用python3.12 -m venv venv等方式切换为3.12版本再进行安装
23.sqlalchemy.exc.ProgrammingError: (psycopg2.errors.UndefinedFunction) function uuid_generate_v4() does not exist
|
1 2 |
<span class="hljs-keyword">CREATE</span> EXTENSION IF <span class="hljs-keyword">NOT</span> <span class="hljs-keyword">EXISTS</span> "uuid-ossp"; |


