安装
应用项目:https://github.com/top-think/think 核心框架:https://github.com/top-think/framework 文档:https://www.kancloud.cn/manual/thinkphp5 以上可选择指定版本下载,然后将应用项目解压到网站根目录,进行重命名,如alan,将核心框架拷贝alan目录下,重命名为thinkphp,此时即完成安装。通过访问http://localhost/alan/public/验证安装是否成功。
|
1 2 3 4 5 6 7 8 9 10 11 12 13 14 15 16 |
// TP5路径格式 http://serverName/index.php(或者其它应用入口文件)/模块/控制器/操作/参数/值... //路由定义,请求类型默认为*即所有,可指定一个或多个(用竖线隔开),如GET|POST Route::rule('路由表达式','路由地址','请求类型','路由参数(数组)','变量规则(数组)'); # 除Route::rule外还有直接针对具体请求类型的Route::get, Route::post Route::any... # 使用路由时建议设置为: 'url_route_must' => true, # 传参:1.在route中配置如:id,2.在url中添加如?name=xxx, 3.通过表单提交,如传入age Route::rule('hello/:id','路由地址'); # 接收参数 1.在action方法中设置function xx($id, $name, $age) # 2. 在action方法体内通过$all = Request::instance()->param();获取所有参数或在param中指定所需获得的参数 # 也可以将param替换成get, post, route来分别获取上述的name, age, id # 3. 在action方法体内通过$all = input('param.');获取所有参数或input('param.id')来获取指定参数 # 同样也可以将param替换成get, post等 # 4. 在action方法中设置function xxx(Request $request) # 然后通过$all = $request->param();获取参数 |
依赖注入、input助手函数 1.自带Server 切换到public目录下执行:
|
1 |
php -S localhost:8080 router.php |
即可在浏览器中执行http://localhost:8080直接进行访问(实际上这是PHP自带的功能) 2.Debug PHP可以通过xdebug来进行断点调试等操作,安装方法: 通过将phpinfo()输出的内容源代码拷贝到https://xdebug.org/wizard.php可获取对应需下载的版本及安装方法,按提示操作即可,在php.ini中需加入的配置
|
1 2 3 4 5 6 7 8 |
zend_extension="xdebug.so" [xdebug] xdebug.default_enable=1 xdebug.remote_enable=1 xdebug.remote_handler=dbgp xdebug.remote_host=127.0.0.1 xdebug.remote_port=9000 xdebug.idekey="PHPSTORM" |
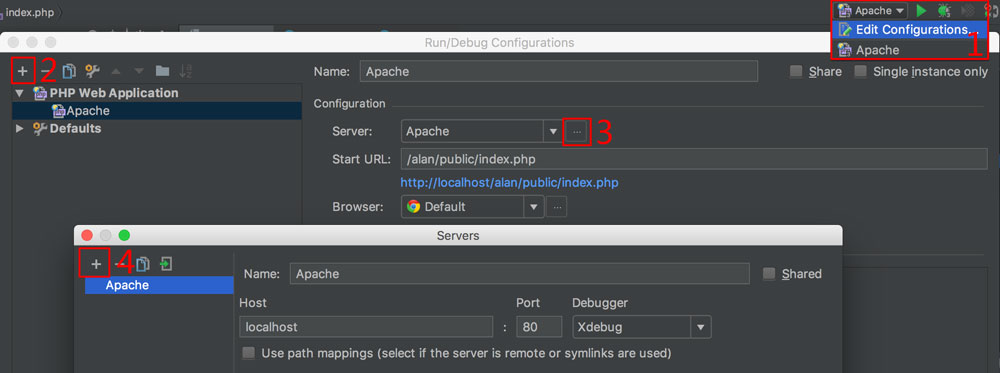
PHP Storm中的配置 Edit Configurations…>左上角加号>PHP Web Application 进入Run/Debug Configurations页面,设置名称 在右侧Configuration下点击Server弹出Servers窗口 点击左上角加号,修改Name,配置Host: localhost 回到Run/Debug Configurations页面在Start URL处输入初始调试页面 点击右上角爬虫图标进行调试 
|
1 2 3 4 5 6 7 8 9 |
$validate = new Validate([ 'name' => 'require|max:10', 'email' => 'email' ]); $result = $validate->batch()->check($data); if(!$result){ var_dump($validate->getError()); } |
验证器封装在单独的文件内
|
1 2 3 4 5 6 7 8 9 10 11 12 13 14 |
# TestValidate class TestValidate extends Validate { protected $rule = [ 'name' => 'require|max:10', 'email' => 'email' ]; } # action方法内 $validate = new TestValidate(); $result = $validate->batch()->check($data); if(!$result){ var_dump($validate->getError()); } |
4. 异常Exception 自定义异常可通过修改config.php中的exception_handle来实现 5.日志 日志路径是在框架文件下的base.php中定义的,想改默认路径可在入口文件index.php中进行定义
|
1 |
define('LOG_PATH', __DIR__ . '/../log/'); |
5. 日志
关闭默认日志将config.php进行如下修改:
|
1 2 |
// 日志记录方式,内置 file socket 支持扩展 'type' => 'Test', |
手动开启,在方法中加入
|
1 2 3 4 5 |
Log::init([ 'type' => 'File', 'path' => LOG_PATH, 'level' => ['error'], ]); |
6. 数据库
原生SQL: Db::query(‘SELECT * FROM….’)
链式查询:Db::table(‘dbname’)->where(‘id’,’=’, $id)->select();
模型类,继承内置的Model,在controller中执行get方法,如BannerModel::get($id),默认TP会根据模型的类名去数据库中查询同名表,如想要不同的话,在类中定义一个protected $table变量来指定表名即可。
不同于上述方法返回组,采取这种方法返回的是一个对象,因此可以将return json($result)修改成return $result,但默认的返回类型是text/html,可在config.php中
|
1 2 3 |
'default_return_type' => 'html' 修改为 'default_return_type' => 'json' |
7.模型类
可以通过在模型类中设置protected $hidden = []来指定隐藏的变量,也可以通过protected $visible = []来指定显示的字段
在application目录下创建extra目录并放置配置文件(如setting.php),默认为自动被框架加载,调用可通过config(‘setting.xxx’)来获取
模型类中可通过读取器public function getXxxAttr($value)来对指定数据表中xxx字段进行设置
关联其它模型有一对一有hasOne, belongsTo,区别在于拥有外键方关联另一张表时使用belongsTo, 而关联拥有外键的表时用hasOne
|
1 2 3 4 |
// 模型内自动写入create_time, update_time, delete protected $autoWriteTimestamp = true; // 修改默认的create_time名称 protected $createTime = ... |
8. 常见配置
|
1 2 3 4 5 6 7 8 |
config.php // 路由使用完整匹配,默认为false 'route_complete_match' => true, database.php // 数据集返回类型,默认为array,也可对数组进行collection($arr)的强制转换,以使用hidden()等方法,对数据集的判空要使用isEmpty()方法 'resultset_type' => 'collection', |
9. 路由
|
1 2 3 4 5 6 7 8 9 10 11 |
Route::get('api/:version/product/by_category', 'api/:version.Product/getAllInCategory'); // 通过设置第4个参数以向下寻找路由,避免下面recent链接访问报错的问题 Route::get('api/:version/product/:id', 'api/:version.Product/getOne', [], ['id'=>'\d+']); Route::get('api/:version/product/recent', 'api/:version.Product/getRecent'); // 路由分组,与上面的等效 Route::group('api/:version/product',function (){ Route::get('/by_category', 'api/:version.Product/getAllInCategory'); Route::get('/:id', 'api/:version.Product/getOne', [], ['id'=>'\d+']); Route::get('/recent', 'api/:version.Product/getRecent'); }); |
10. 事务
|
1 2 3 4 5 6 |
// 开启事务 Db::startTrans(); // 执行 Db::commit(); // 回滚 Db::rollback(); |
小技巧
1.PHPStorm中去除未被使用的引用快捷键(Ctrl+Option/Alt+O)
2.PHPStorm自动补全Namespace Preferences > Directories 点击application目录,选中Sources,点击Source Folders下application右侧的P图标,在弹出的窗口中输入app(可通过application/config.php修改默认值app)保存。再次创建类文件时会自动填写Namespace部分的内容
3.命令行创建模型、控制器
|
1 2 3 |
# 进入项目根目录 php think make:model xxx php think make:controller xxx |
扩展:PSR-4与PSR-0


