前面关于ORM的章节我们讲述了在Magento中有两种模型,一种是普通模型,另一种是EAV(Entity Atrribute Value)模型。本节我们就来进一步的了解EAV模型。
在Magento中所有与数据库交互的模型都继承自Mage_Core_Model_Abstract, Varien_Object,而普通模型与EAV模型的区别在于模型资源。所有的资源都继承基础类Mage_Core_Model_Resource_Abstract,普通模型有一个继承自Mage_Core_Model_Resource_Db_Abstract的资源,而EAV模型则有一个继承自Mage_Eav_Model_Entity_Abstract的资源。
那么什么是EAV呢?维基百科上的解释是:
Entity–attribute–value model (EAV) is a data model to describe entities where the number of attributes
(properties, parameters) that can be used to describe them is potentially vast, but the number that will actually apply to a given entity is relatively modest. In mathematics, this model is known as a sparse matrix. EAV is also
known as object–attribute–value model, vertical database model and open schema.
还可以这样理解,EAV为数据库表格schema带来某些方面的标准化,传统的数据库中数据表具有固定的列数。
+------------------+
| products         |
+------------------+
| product_id       |
| name             |
| price            |
| etc..            |
+------------------+

+------------+----------------+------------------+---------+
| product_id | name           | price            | etc...  |
+------------+----------------+------------------+---------+
| 1          | Widget A       | 11.34            | etc...  |
+------------+----------------+------------------+---------+
| 2          | Dongle B       | 6.34             | etc...  |
+------------+----------------+------------------+---------+
以产品表为例,就是每个产品都有名称、价格等等。而在EAV模型中,每个实体(entity)如产品都可能会有一组不同的属性,从电商平台来看EAV有着重要的价值。比如对笔记本网站而言会有CPU 频率、颜色、内存大小等属性,而毛衣网站则有颜色属性但没有内存大小。即使针对毛衣相关的产品,有些是按长度计的(如毛线),而有些则按直径大小计的(如棒针)。
开源或付费数据库中默认支持EAV的并不多,因而Magento团队通过以MySQL做为数据存储的PHP对象创建了EAV系统,换句话说是在传统的关系型数据库基础上创建了EAV数据库系统。
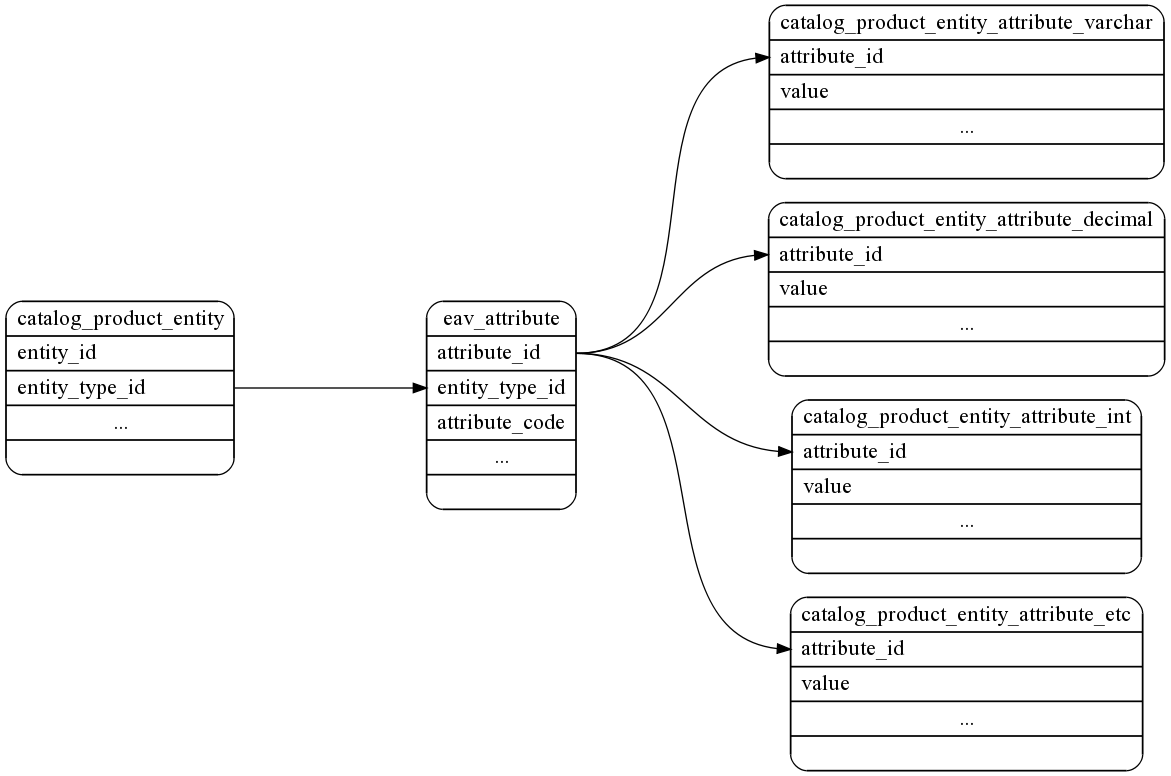
从实践角度来说就是任何使用EAV资源的模型,属性将散布在多张MySQL数据表中。
上表大致演示了在操作catalog_product实体查询一条EAV记录时所涉及的一些数据表,每个产品都记录在catalog_product_entity表的某一行中。整个系统中所有的属性都会存储在eav_attribute中,而产品真正的属性值则存储在catalog_product_entity_varchar, catalog_product_entity_decimal等以catalog_product_entity_开头的表格中。
EAV所具有的灵活性让我们在实际工作中添加新的属性时无需使用ALTER TABLE语句来操作,仅需在eav_attribute表中新插入一行即可。而在传统的关系型数据库中,这种操作需要通过ALTER语句来修改数据结构,对于较大的表而言不仅耗时而且存在潜在风险。
这样做也有一个缺点,就是如果想要获取产品数据时,一个简单的SQL语句是肯定无法实现的,需要嵌套多条语句或连接多张数据表。
以上就是关于EAV的简介,下面我们会通过实例来一步步创建EAV模型,这次我们再创建一个博客文章的模型但是我们将用到会是EAV
模型,如果大家看过前的章节一定已经非常熟悉了,点此略过,这里简单说一下,创建
app/code/local/Alanhou/Complexworld/etc/config.xml文件加入如下代码:
<config>
	<modules>
		<Alanhou_Complexworld>
			<version>0.1.0</version>
		</Alanhou_Complexworld>
	</modules>
	<frontend>
		<routers>
			<complexworld>
				<use>standard</use>
				<args>
					<module>Alanhou_Complexworld</module>
					<frontName>complexworld</frontName>
				</args>
			</complexworld>
		</routers>
	</frontend>
</config>
创建app/etc/modules/Alanhou_Complexworld.xml加入以下代码:
<config>
	<modules>
		<Alanhou_Complexworld>
			<active>true</active>
			<codePool>local</codePool>
		</Alanhou_Complexworld>
	</modules>
</config>
创建app/code/local/Alanhou/Complexworld/controllers/IndexController.php文件并加入如下代码:
<?php
class Alanhou_Complexworld_IndexController extends Mage_Core_Controller_Front_Action{
	public function indexAction(){
		echo 'Hello Complexworld!';
	}
}
此时访问http://localhost/magento/complexworld即会在页面上输出Hello Complexworld!
EAV风格的Weblog
下一步我们创建一个名为Weblogeav的模型,首先在config.xml中加入以下代码:
<global>
	<models>
		<complexworld>
			<class>Alanhou_Complexworld_Model</class>
			<resourceModel>complexworld_resource</resourceModel>
		</complexworld>

		<complexworld_resource>
			<class>Alanhou_Complexworld_Model_Resource</class>
			<entities>
				<eavblogpost>

<table>eavblog_posts</table>

				</eavblogpost>
			</entities>
		</complexworld_resource>
	</models>
</global>
截至目前和创建一个普通的模型资源还没有什么区别,我们通过<class />标签设置了PHP类,同时添加<entities />代码段来告知Magento我们所要创建模型的基本表名称,<eavblogpost />标签是将要创建的模型名称,而其中的<table/>标签用于指定这个模型将用到的基础表。
在我们前面的IndexController.php中加入如下代码:
	public function indexAction(){
		$weblog2 = Mage::getModel('complexworld/eavblogpost');
		$weblog2->load(1);
		var_dump($weblog2);
	}
此时访问http://localhost/magento/complexworld/会出现类似如下报错
Warning: include(Alanhou\Complexworld\Model\Eavblogpost.php): failed to open stream: No such file or directory
in D:\xampp\htdocs\magento\lib\Varien\Autoload.php on line 94
这段提示不仅告诉了我们需要在哪个路径下添加新资源,它还进行了配置检查,如果是下面这样的提示:
Warning: include(Mage\Complexworld\Model\Eavblogpost.php) [function.include]: failed to open stream: No such file or directory in D:\xampp\htdocs\magento\lib\Varien\Autoload.php on line 94
我们就会知道模型的配置存在问题,因为此时Magento是在code/core/Mage中查找模型,而不是在code/local/Alanhou中查找。下面我就来创建模型类,在app/code/local/Alanhou/Complexworld/Model/Eavblogpost.php中添加如下代码:
<?php
	class Alanhou_Complexworld_Model_Eavblogpost extends Mage_Core_Model_Abstract{
		protected function _construct()
		{
			$this->_init('complexworld/eavblogpost');
		}
	}
注意:模型本身独立于资源,不论是普通模型还是EAV模型都继承自相同的类,它们的区别在资源上。刷新缓存重新加载页面会出现新的提示:
Warning: include(Alanhou\Complexworld\Model\Resource\Eavblogpost.php): failed to open stream: No such file or

directory  in D:\xampp\htdocs\magento\lib\Varien\Autoload.php on line 94
按照提示我们再创建app/code/local/Alanhou/Complexworld/Model/Resource/Eavblogpost.php并添加如下代码:
<?php class Alanhou_Complexworld_Model_Resource_Eavblogpost extends Mage_Eav_Model_Entity_Abstract{
 	protected function _construct(){
 		$resource = Mage::getSingleton('core/resource');
 		$this->setType('complexworld_eavblogpost');
		$this->setConnection(
			$resource->getConnection('complexworld_read'),
			$resource->getConnection('complexworld/write')
		);
	}
}
这里我们已经可以看到普通模型资源和EAV模型资源的差别,首先我继承的类名是Mage_Eav_Model_Entity_Abstract,虽然Mage_Eav_Model_Entity_Abstract也使用了与普通模型资源相同的_construct方法,但这里并没有用到_init方法,取而代之的是使用了自己的代码。这里指明了使用何种连接资源,并将唯一标识符传递给我们对象中的setType方法。
刷新缓存重新访问页面,会出现如下报错
Invalid entity_type specified: complexworld_eavblogpost
这里报的的entity_type就是前面通过setType所设置的
$this->etType('complexworld_eavblogpost');
每个实体都有类型,类型就是为了让EAV系统知道模型要使用哪些属性,以及连接哪些存储性值的表格。我们需要告诉Magento添加了新的实体类型,那么我们查看一下eav_entity_type一表:
mysql> select * from eav_entity_type limit 2 \G;
*************************** 1. row ***************************
             entity_type_id: 1
           entity_type_code: customer
               entity_model: customer/customer
            attribute_model: customer/attribute
               entity_table: customer/entity
         value_table_prefix: NULL
            entity_id_field: NULL
            is_data_sharing: 1
           data_sharing_key: default
   default_attribute_set_id: 1
            increment_model: eav/entity_increment_numeric
        increment_per_store: 0
       increment_pad_length: 8
         increment_pad_char: 0
 additional_attribute_table: customer/eav_attribute
entity_attribute_collection: customer/attribute_collection
*************************** 2. row ***************************
             entity_type_id: 2
           entity_type_code: customer_address
               entity_model: customer/address
            attribute_model: customer/attribute
               entity_table: customer/address_entity
         value_table_prefix: NULL
            entity_id_field: NULL
            is_data_sharing: 1
           data_sharing_key: default
   default_attribute_set_id: 2
            increment_model: NULL
        increment_per_store: 0
       increment_pad_length: 8
         increment_pad_char: 0
 additional_attribute_table: customer/eav_attribute
entity_attribute_collection: customer/address_attribute_collection
2 rows in set (0.00 sec)
这张表中包含了系统中所有的实体属性,本例中的complexworld_eavblogpost对应于entity_type_code一列。
接下来我们就来创建Setup资源。理论上可以手动在eav_entity_type表中为complexworld_eavblogpost插入一行值,但我们不推荐这么做。还好Magento提供了专门的安装资源,含有一些helper方法可以自动创建一所需的记录来让系统正常运行。
首先在config.xml中添加一段代码:
<global>
	<!--...-->
	<resources>
		<complexworld_setup>
			<setup>
				<module>Alanhou_Complexworld</module>
				<class>Alanhou_Complexworld_Model_Resource_Setup</class>
			</setup>
		</complexworld_setup>
	</resources>
	<!--...-->
</global>
然后创建app/code/local/Alanhou/Complexworld/Model/Resource/Setup.php并添加如下类:
<?php
class Alanhou_Complexworld_Model_Resource_Setup extends Mage_Eav_Model_Entity_Setup{

}
注意我们这里继承的类是 Mage_Eav_Model_Entity_Setup而不是Mage_Core_Model_Resource_Setup,最后我们就来创建安装脚本,创建app/code/local/Alanhou/Complexworld/sql/complexworld_setup/install-0.1.0.php并加入如下代码:
<?php
$installer = $this;
throw new Exception("This is an exception to stop the installer from completing");
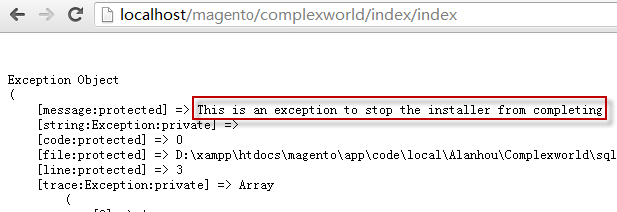
清除缓存重新访问页面,如果你看到页面中抛出了上面添加的异常就说明我们安装资源配置没有问题。
接下来我们在安装脚本中删除出抛出异常代码段,修改脚本内容如下:
<?php $installer = $this; $installer->startSetup();
$installer->addEntityType('complexworld_eavblogpost',array(
	//entity_model is the URI you'd pass into a Mage::getModel() call
	'entity_model' => 'complexworld/eavblogpost',
	//table refers to the resource URI complexworld/eavblogpost
    //<complexworld_resource>...<eavblogpost>
    'table' => 'complexworld/eavblogpost',
	));
$installer->endSetup();
这里我们在安装脚本中调用了addEntityType方法,该方法可以传递实体类型以及一系参数来设置默认值。运行此脚本后会在eav_attribute_group, eav_attribute_set和eav_entity)type表中产生新的行。
重新访问页面会出现如下报错:
SQLSTATE[42S02]: Base table or view not found: 1146 Table 'magento.eavblog_posts' doesn't exist, query was: SELECT

<code>eavblog_posts</code>.* FROM <code>eavblog_posts</code> WHERE (entity_id =1)
注:如果你学习了之前的章节,就会知道版本号存放在core_resource一表中,为保证安装脚本正常运行,可能需要经常执行如下操作:
delete from core_resource where code= 'complexworld_setup';
前面我们已经把实体类型告诉给Magento了,下面我们需要创建一个MySQL表格用于存储实体的值,并且还要进行配置来让系统知道所创建的这些表。
EAV安装资源中有一个名为createEntityTables的方法,它会自动设置我们所需的数据表,并向系统添加一些配置行,下面就在安装脚本中添加如下代码:
$installer->createEntityTables(
	$this->getTable('complexworld/eavblogpost')
);
createEntityTables方法中可传入两个参数,第一个是基础表的名称,第二是一系列选项。这里我们用到了安装资源的getTable方法来从配置中抓出表名,也就是前面设置的eavblog_posts。本例中我们省去了第二个参数,通常只要进行更高级的开发时才会使用这一选项。再次访问页面,会发现创建了以下表格:
mysql> show tables like 'eavblog_posts%';
+--------------------------------+
| Tables_in_magento (eavblog_posts%) |
+--------------------------------+
| eavblog_posts                  |
| eavblog_posts_char             |
| eavblog_posts_datetime         |
| eavblog_posts_decimal          |
| eavblog_posts_int              |
| eavblog_posts_text             |
| eavblog_posts_varchar          |
+--------------------------------+
7 rows in set (0.01 sec)
此外在eav_attribute_set表中还是新增一行:
mysql> select * from eav_attribute_set order by attribute_set_id DESC LIMIT 1 \G

*************************** 1. row ***************************
  attribute_set_id: 10
    entity_type_id: 10
attribute_set_name: Default
        sort_order: 2
1 row in set (0.08 sec)
再次访问http://localhost/mgt/complexworld,不再出现报错。最后我们需要告诉EAV模型我们需要哪些属性,这与在普通数据表中添加列是等价的。同样,我们还将通过安装资源来进行操作,这次用到的方法名为addAttribute。先在安装脚本中添加如下代码来为Eavblogpost添加一个属性:
$this->addAttribute('complexworld_eavblogpost', 'title', array(
        //the EAV attribute type, NOT a MySQL varchar
        'type'              => 'varchar',
        'label'             => 'Title',
        'input'             => 'text',
        'class'             => '',
        'backend'           => '',
        'frontend'          => '',
        'source'            => '',
        'required'          => true,
        'user_defined'      => true,
        'default'           => '',
        'unique'            => false,
    ));
addAttribute方法中的第一个参数是实体类型code,它需要与addEntityType相符,如果想要查看Magento中还有哪些其它实体,可查询eav_entity_type表中的entity_type_code一列;第二个参数是属性code,在同一个实体中该名称不可重复;第三个参数是一个数组,用于描述属性,为了简化我们这里只定义了一个属性,实际上是可以同时添加多个的。
值得一提的是以下这一行
'type' => 'varchar'
它定义属性所包含的值的类型,前面我们提到以下这些表
eavblog_posts_char
eavblog_posts_datetime
eavblog_posts_decimal
eavblog_posts_int
eavblog_posts_text
eavblog_posts_varchar
这些并不是指MySQL中列的属性而是EAV属性类型,其名称(如decimal, varchar等)即表示其中所存储的数据。前面数组中所有这些属性都是可以的,如果我们不予以指定Magento就会使用默认值。这些默认值由Mage_Eav_Model_Entity_Setup类中的_prepareValues所定义,详情如下:
protected function _prepareValues($attr)
{
$data = array(
    'backend_model'   => $this->_getValue($attr, 'backend'),
    'backend_type'    => $this->_getValue($attr, 'type', 'varchar'),
    'backend_table'   => $this->_getValue($attr, 'table'),
    'frontend_model'  => $this->_getValue($attr, 'frontend'),
    'frontend_input'  => $this->_getValue($attr, 'input', 'text'),
    'frontend_label'  => $this->_getValue($attr, 'label'),
    'frontend_class'  => $this->_getValue($attr, 'frontend_class'),
    'source_model'    => $this->_getValue($attr, 'source'),
    'is_required'     => $this->_getValue($attr, 'required', 1),
    'is_user_defined' => $this->_getValue($attr, 'user_defined', 0),
    'default_value'   => $this->_getValue($attr, 'default'),
    'is_unique'       => $this->_getValue($attr, 'unique', 0),
    'note'            => $this->_getValue($attr, 'note'),
    'is_global'       => $this->_getValue($attr, 'global', 1),
    );
    return $data;

 }
该方法中的_getValue的第二个值对应addAttribute中的键,第三个就是默认值,所以Magento默认会认为你在添加一个varchar属性。
接下来我们为博客内容和发表日期添加属性,最终的脚本内容如下:
<?php $installer = $this; $installer->startSetup();
$installer->addEntityType('complexworld_eavblogpost',array(
	//entity_model is the URI you'd pass into a Mage::getModel() call
	'entity_model' => 'complexworld/eavblogpost',
	//table refers to the resource URI complexworld/eavblogpost
    //<complexworld_resource>...<eavblogpost>
    'table' => 'complexworld/eavblogpost',
	));
$installer->createEntityTables(
	$this->getTable('complexworld/eavblogpost')
);

$this->addAttribute('complexworld_eavblogpost', 'title', array(
        //the EAV attribute type, NOT a MySQL varchar
        'type'  => 'varchar',
        'label'  => 'Title',
        'input' => 'text',
        'class'  => '',
        'backend'  => '',
        'frontend' => '',
        'source' => '',
        'required' => true,
        'user_defined' => true,
        'default' => '',
        'unique' => false,
    ));
$this->addAttribute('complexworld_eavblogpost','content',array(
	'type' => 'text',
	'label' => 'Content',
	'input' => 'textarea',
	));

$this->addAttribute('complexworld_eavblogpost','data',array(
	'type' => 'datetime',
	'label' => 'Post Date',
	'input' => 'datetime',
	'required' => false,
	));
$installer->endSetup();
现在我们再最后刷新一次,安装脚本将会运行,调用addAttribute方法后:
- 在eav_entity_type表中会增加一个complexworld_eavblogpost的实体类型
- 在eav_attribute表中会增加一个title属性
- 在eav_attribute表中会增加一个content属性
- 在eav_attribute表中会增加一个date属性
- eav_entity_attribute表中会增加一行
显然这个博客模型很不完善,但让我添加一行并循环取出内容来进行测试,在IndexController.php中添加如下Action
public function populateEntriesAction(){
	for($i=0; $i<10; $i++){
 		$weblog2 = Mage::getModel('complexworld/eavblogpost');
 		$weblog2->setTitle('This is a test '.$i);
		$weblog2->setContent('This is test content '.$i);
		$weblog2->setDate(now());
		$weblog2->save();
	}

	echo 'Done';
}

public function showCollectionAction(){
	$weblog2 = Mage::getModel('complexworld/eavblogpost');
	$entries = $weblog2->getCollection()
		->addAttributeToSelect('title')
		->addAttributeToSelect('content');
	$entries->load();
	foreach ($entries as $entry) {
		// var_dump($entry->getData());
		echo '<h2>'.$entry->getTitle().'</h2>';
		echo '<p>Date: '.$entry->getDate().'</p>';
		echo '<p>'.$entry->getContent().'</p>';
	}
	echo '<br>Done<br>';
}
我们访问http://localhost/magento/complexworld/index/populateEntries
然后到数据库中查询一下新添加的10行数据
SELECT * FROM eavblog_posts ORDER BY entity_id DESC;
以及在eavblog_posts_varchar表中新增的10行记录:
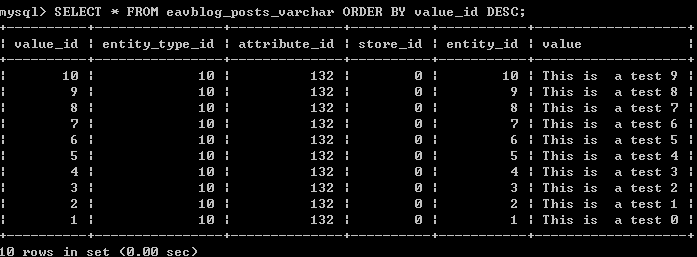
SELECT * FROM eavblog_posts_varchar ORDER BY value_id DESC;
请注意eavblog_posts_varchar与eavblog_posts这两张表通过entity_id进行连接
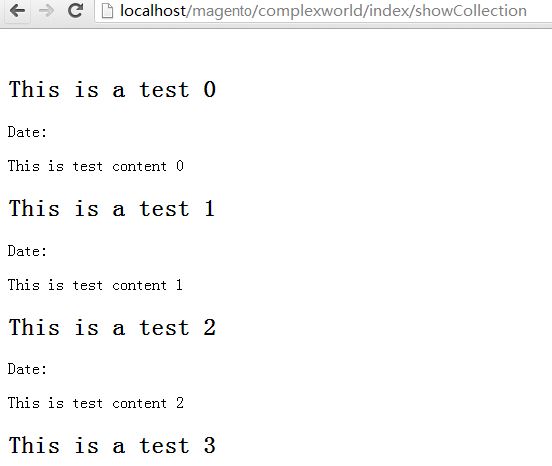
最后我们通过访问http://localhost/magento/complexworld/index/showCollection来把数据提取出来
这时会出现如下报错
Warning: include(Alanhou\Complexworld\Model\Resource\Eavblogpost\Collection.php): failed to open stream: No such file or directory in D:\xampp\htdocs\mgt\lib\Varien\Autoload.php on line 94
离胜利还差一步,我们这里没有为集合对象添加类,方法和添加一个常规的模型资源相似,创建
Alanhou/Complexworld/Model/Resource/Eavblogpost/Collection.php
<?php
class Alanhou_Complexworld_Model_Resource_Eavblogpost_Collection extends Mage_Eav_Model_Entity_Collection_Abstract{ 	protected function _construct(){
 		$this->_init('complexworld/eavblogpost');
	}
}
这是一个初始化模型标准的_construct方法,重新载入页面,我们就可以看到所有的标题和内容输出,但是没有日期值。
可能你会注意到集合加载有些不一样
$entries = $weblog2->getCollection()
	->addAttributeToSelect('title')
	->addAttributeToSelect('conent');
因为查询EAV中的数据会用到大量的SQL,我们需要指定模型需要哪些属性,这样系统只查询那些需要的数据。如果不在乎性能上的损耗,可以使用如下方法获取所有属性
$entries = $weblog2->getCollection()->addAttributeToSelect('*');
当然关于EAV还有更多的内容,就本例而言,还可以进行如下的探讨
- EAV属性不仅限于datetime, decimal, int, text和varchar,我们还可以创建其它类来为更多的属性建模,这也是attribute_model实体属性的作用
- 集合过滤:EAV集合的过滤会有些麻烦,尤其是针对我们上面提到的非普通属性,需要在加载前在集合中使用addAttributeToFilter
- Magento中的EAV层级:Magento使用基本EAV模型创建与店铺功能相关的层级结构,这个结构有有助于减少EAV模型生成的查询的数量
EAV模型可以说是Magento系统开发过程中会碰到的最复杂的部分,随着逐步的使用就会慢慢地适应其用法。
http://localhost/magento/complexworld/index/showCollection显示结果:
注:在本例中除了需经常删除core_resource中的对应行外,还可能会需要删除eavblog_posts相关表格,可采用如下语句:
SET FOREIGN_KEY_CHECKS=0;
drop table  eavblog_posts;
drop table  eavblog_posts_char;
drop table  eavblog_posts_datetime;
drop table  eavblog_posts_decimal;
drop table  eavblog_posts_int;
drop table  eavblog_posts_text;
drop table  eavblog_posts_varchar;


