大多数人工智能领域的工具都会使用到Python,这个需要提前安装,同时推荐使用虚拟环境进行环境的隔离,比如用Anaconda(conda create -n xxx )或者使用Python自带的模块创建虚拟环境(python -m venv xxx)。同时在使用前请记得激活环境。
训练
我们使用llama-3-chinese-8b-instruct-v3,好处是它已经通过中文语料进行了训练,将https://huggingface.co/hfl/llama-3-chinese-8b-instruct-v3/tree/main链接下的文件下载到本地目录。
注:如果在Huggingface上直接申请Llama模型的访问权限,国家最好不要选择中国,Alan的测试是选择中国遭拒,而选择美国则通过申请。
想过执行代码来自Chinese-LLaMA-Alpaca-3项目,执行代码这里使用了Git Bash,这样在Windows下可以获取和Linux相似的使用体验。
训练的代码位于scripts/training目录下,如果使用的是Mac或Linux,可以直接修改run_sft.sh中相关目录直接运行Shell脚本。以下演示为通过Python代码运行:
|
1 |
python run_clm_sft_with_peft.py --model_name_or_path /d/workspace/llama-3-chinese-8b-instruct-v3 --tokenizer_name_or_path /d/workspace/llama-3-chinese-8b-instruct-v3 --dataset_dir /d/workspace/Chinese-LLaMA-Alpaca-3/data --per_device_train_batch_size 1 --per_device_eval_batch_size 1 --do_train 1 --do_eval 1 --seed 42 --bf16 1 --num_train_epochs 3 --lr_scheduler_type cosine --learning_rate 1e-4 --warmup_ratio 0.05 --weight_decay 0.1 --logging_strategy steps --logging_steps 10 --save_strategy steps --save_total_limit 3 --evaluation_strategy steps --eval_steps 100 --save_steps 200 --gradient_accumulation_steps 8 --preprocessing_num_workers 8 --max_seq_length 1024 --output_dir /d/workspace/output --overwrite_output_dir 1 --ddp_timeout 30000 --logging_first_step True --lora_rank 64 --lora_alpha 128 --trainable "q_proj,v_proj,k_proj,o_proj,gate_proj,down_proj,up_proj" --lora_dropou 0.05 --modules_to_save "embed_tokens,lm_head" --torch_dtype bfloat16 --validation_file /d/workspace/Chinese-LLaMA-Alpaca-3/data/ruozhiba_qa2449_gpt4t.json --load_in_kbits 16 --low_cpu_mem_usage True |
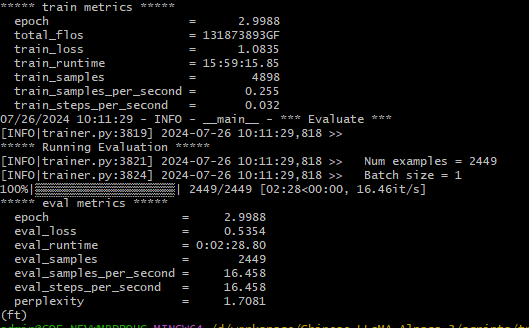
以上数据集和验证集在做私有数据训练时需做相应修改,这里使用原仓库中的数据进行了演示,训练时间取决于硬件设备,我这里跑了一整夜:
合并
训练完成后如需具备通用模型的能力还应与原模型进行合并操作,这一代码在Alpaca的scripts目录下,命令如下:
|
1 |
python merge_llama3_with_chinese_lora_low_mem.py --base_model /d/workspace/llama-3-chinese-8b-instruct-v3 --lora_model /d/workspace/output --output_dir /d/workspace/output_merge |
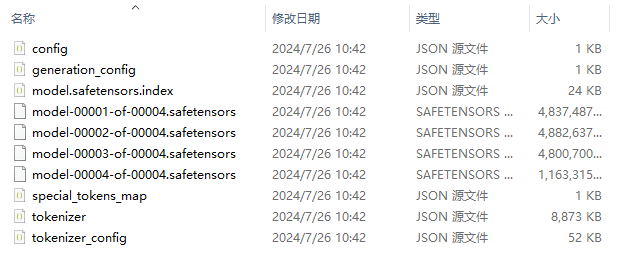
得到的文件如下:
量化
可以看到上图中的文件占用约15 GB,文件也较多,不利于部署,通常都会先进行量化处理,这里选择的项目为:https://github.com/ggerganov/llama.cpp
|
1 2 3 |
git clone https://github.com/ggerganov/llama.cpp.git cd llama.cpp/ pip install -r requirements/requirements-convert_hf_to_gguf.txt |
Linux和Mac下直接执行make,Windows如无cmake,下载cmake,然后执行:
|
1 2 3 4 5 |
cmake -B build cmake --build build --config Release python convert_hf_to_gguf.py ../output_merge --outtype f16 --outfile ../output_models/llama3_chinese-8B-F16.gguf ./llama-quantize ../output_models/llama3_chinese-8B-F16.gguf ../output_models/llama3_chinese-8B-q4_0.gguf q4_0 |
量化后的llama3_chinese-8B-q4_0.gguf文件仅为4.5 GB。量化的算法较多,
WSL在make时会出现报错:
scripts/build-info.sh: 31: Syntax error: end of file unexpected (expecting "then"),需执行:
出现
CMake Error at CMakeLists.txt:2 (project): Running 'nmake' '-?' failed with: 系统找不到指定的文件。尝试删除build目录再执行cmake,如仍有问题可能和cmake与Visual Studio的安装有关,Alan直接使用Visual Studio所安装的cmake执行并没有发生异常(我安装在D盘,所以添加的环境变量为:D:\Program Files\Microsoft Visual Studio\2022\Community\Common7\IDE\CommonExtensions\Microsoft\CMake\CMake\bin)。编译后的命令位于build/bin/Release目录中。
部署
依然使用Alpaca项目,我们将使用Ollama进行部署,所以进入scripts/ollama目录,将Modelfile文件中FROM后的文件修改为刚刚所保存的llama3_chinese-8B-q4_0.gguf文件路径,然后创建模型,名称可自己选择:
|
1 |
ollama create llama3-chinese-8b-q4 -f Modelfile |
执行以下命令运行该模型:
|
1 |
ollama run llama3-chinese-8b-q4 |
此时就会发现模型不仅具备底座模型的能力,还可以回答我们微调数据集中的相关问题。


