第一步,用 Root 用户登录 Linux 系统,并创建普通用户。
|
1 2 3 4 5 6 |
# useradd going # 创建 going 用户,通过 going 用户登录开发机进行开发 # passwd going # 设置密码 Changing password for user going. New password: Retype new password: passwd: all authentication tokens updated successfully. |
第二步,添加 sudoers。
|
1 |
# sed -i '/^root.*ALL=(ALL).*ALL/a\going\tALL=(ALL) \tALL' /etc/sudoers |
第三步,用新的用户名(going)和密码登录 Linux 服务器。这一步也可以验证普通用户是否创建成功。
第四步,配置 $HOME/.bashrc 文件。
我们登录新服务器后的第一步就是配置 $HOME/.bashrc 文件,以使 Linux 登录 shell 更加易用,例如配置 LANG解决中文乱码,配置 PS1可以避免整行都是文件路径,并将 $HOME/bin加入到 PATH路径中。配置后的内容如下:
|
1 2 3 4 5 6 7 8 9 10 11 12 13 14 15 16 17 18 19 20 21 22 |
# .bashrc # User specific aliases and functions alias rm='rm -i' alias cp='cp -i' alias mv='mv -i' # Source global definitions if [ -f /etc/bashrc ]; then . /etc/bashrc fi # User specific environment # Basic envs export LANG="en_US.UTF-8" # 设置系统语言为 en_US.UTF-8,避免终端出现中文乱码 export PS1='[\u@dev \W]\$ ' # 默认的 PS1 设置会展示全部的路径,为了防止过长,这里只展示:"用户名@dev 最后的目录名" export WORKSPACE="$HOME/workspace" # 设置工作目录 export PATH=$HOME/bin:$PATH # 将 $HOME/bin 目录加入到 PATH 变量中 # Default entry folder cd $WORKSPACE # 登录系统,默认进入 workspace 目录 |
配置完 $HOME/.bashrc后,我们还需要创建工作目录 workspace。将工作文件统一放在$HOME/workspace目录中,有几点好处。
- 可以使我们的$HOME目录保持整洁,便于以后的文件查找和分类。
- 如果哪一天 /分区空间不足,可以将整个 workspace 目录 mv 到另一个分区中,并在 /分区中保留软连接,例如:/home/going/workspace -> /data/workspace/。
- 如果哪天想备份所有的工作文件,可以直接备份 workspace。
|
1 |
$ mkdir -p $HOME/workspace |
依赖安装和配置
第一步,安装依赖
|
1 |
$ sudo yum -y install make autoconf automake cmake perl-CPAN libcurl-devel libtool gcc gcc-c++ glibc-headers zlib-devel git-lfs telnet ctags lrzsz jq expat-devel openssl-devel |
第二步,安装 Git。
|
1 2 3 4 5 6 7 8 9 |
$ cd /tmp $ wget https://mirrors.edge.kernel.org/pub/software/scm/git/git-2.30.2.tar.gz $ tar -xvzf git-2.30.2.tar.gz $ cd git-2.30.2/ $ ./configure $ make $ sudo make install $ git --version # 输出 git 版本号,说明安装成功 git version 2.30.2 |
把 Git 的二进制目录添加到 PATH 路径中:
|
1 2 3 4 |
tee -a $HOME/.bashrc <<'EOF' # Configure for git export PATH=/usr/local/libexec/git-core:$PATH EOF |
第三步,配置 Git。我们直接执行如下命令配置 Git:
|
1 2 3 4 |
$ git config --global user.name "Lingfei Kong" # 用户名改成自己的 $ git config --global user.email "colin404@foxmail.com" # 邮箱改成自己的 $ git config --global credential.helper store # 设置 Git,保存用户名和密码 $ git config --global core.longpaths true # 解决 Git 中 'Filename too long' 的错误 |
首先,在 Git 中,我们会把非 ASCII 字符叫做 Unusual 字符。这类字符在 Git 输出到终端的时候默认是用 8 进制转义字符输出的(以防乱码),但现在的终端多数都支持直接显示非 ASCII 字符,所以我们可以关闭掉这个特性,具体的命令如下:
|
1 |
$ git config --global core.quotepath off |
其次,如果你觉得访问 github.com 太慢,可以通过国内 GitHub 镜像网站来访问,配置方法如下:
|
1 |
$ git config --global url."https://github.com.cnpmjs.org/".insteadOf "https://github.com/" |
最后,GitHub 限制最大只能克隆 100M 的单个文件,为了能够克隆大于 100M 的文件,我们还需要安装 Git Large File Storage,安装方式如下:
|
1 |
$ git lfs install --skip-repo |
Go 编译环境安装和配置
go1.17.2 版本示例:
|
1 |
$ wget https://golang.google.cn/dl/go1.17.2.linux-amd64.tar.gz -O /tmp/go1.17.2.linux-amd64.tar.gz |
解压安装:
|
1 2 3 |
$ mkdir -p $HOME/go $ tar -xvzf /tmp/go1.17.2.linux-amd64.tar.gz -C $HOME/go $ mv $HOME/go/go $HOME/go/go1.17.2 |
环境变量:
|
1 2 3 4 5 6 7 8 9 10 11 12 |
tee -a $HOME/.bashrc <<'EOF' # Go envs export GOVERSION=go1.17.2 # Go 版本设置 export GO_INSTALL_DIR=$HOME/go # Go 安装目录 export GOROOT=$GO_INSTALL_DIR/$GOVERSION # GOROOT 设置 export GOPATH=$WORKSPACE/golang # GOPATH 设置 export PATH=$GOROOT/bin:$GOPATH/bin:$PATH # 将 Go 语言自带的和通过 go install 安装的二进制文件加入到 PATH 路径中 export GO111MODULE="on" # 开启 Go moudles 特性 export GOPROXY=https://goproxy.cn,direct # 安装 Go 模块时,代理服务器设置 export GOPRIVATE= export GOSUMDB=off # 关闭校验 Go 依赖包的哈希值 EOF |
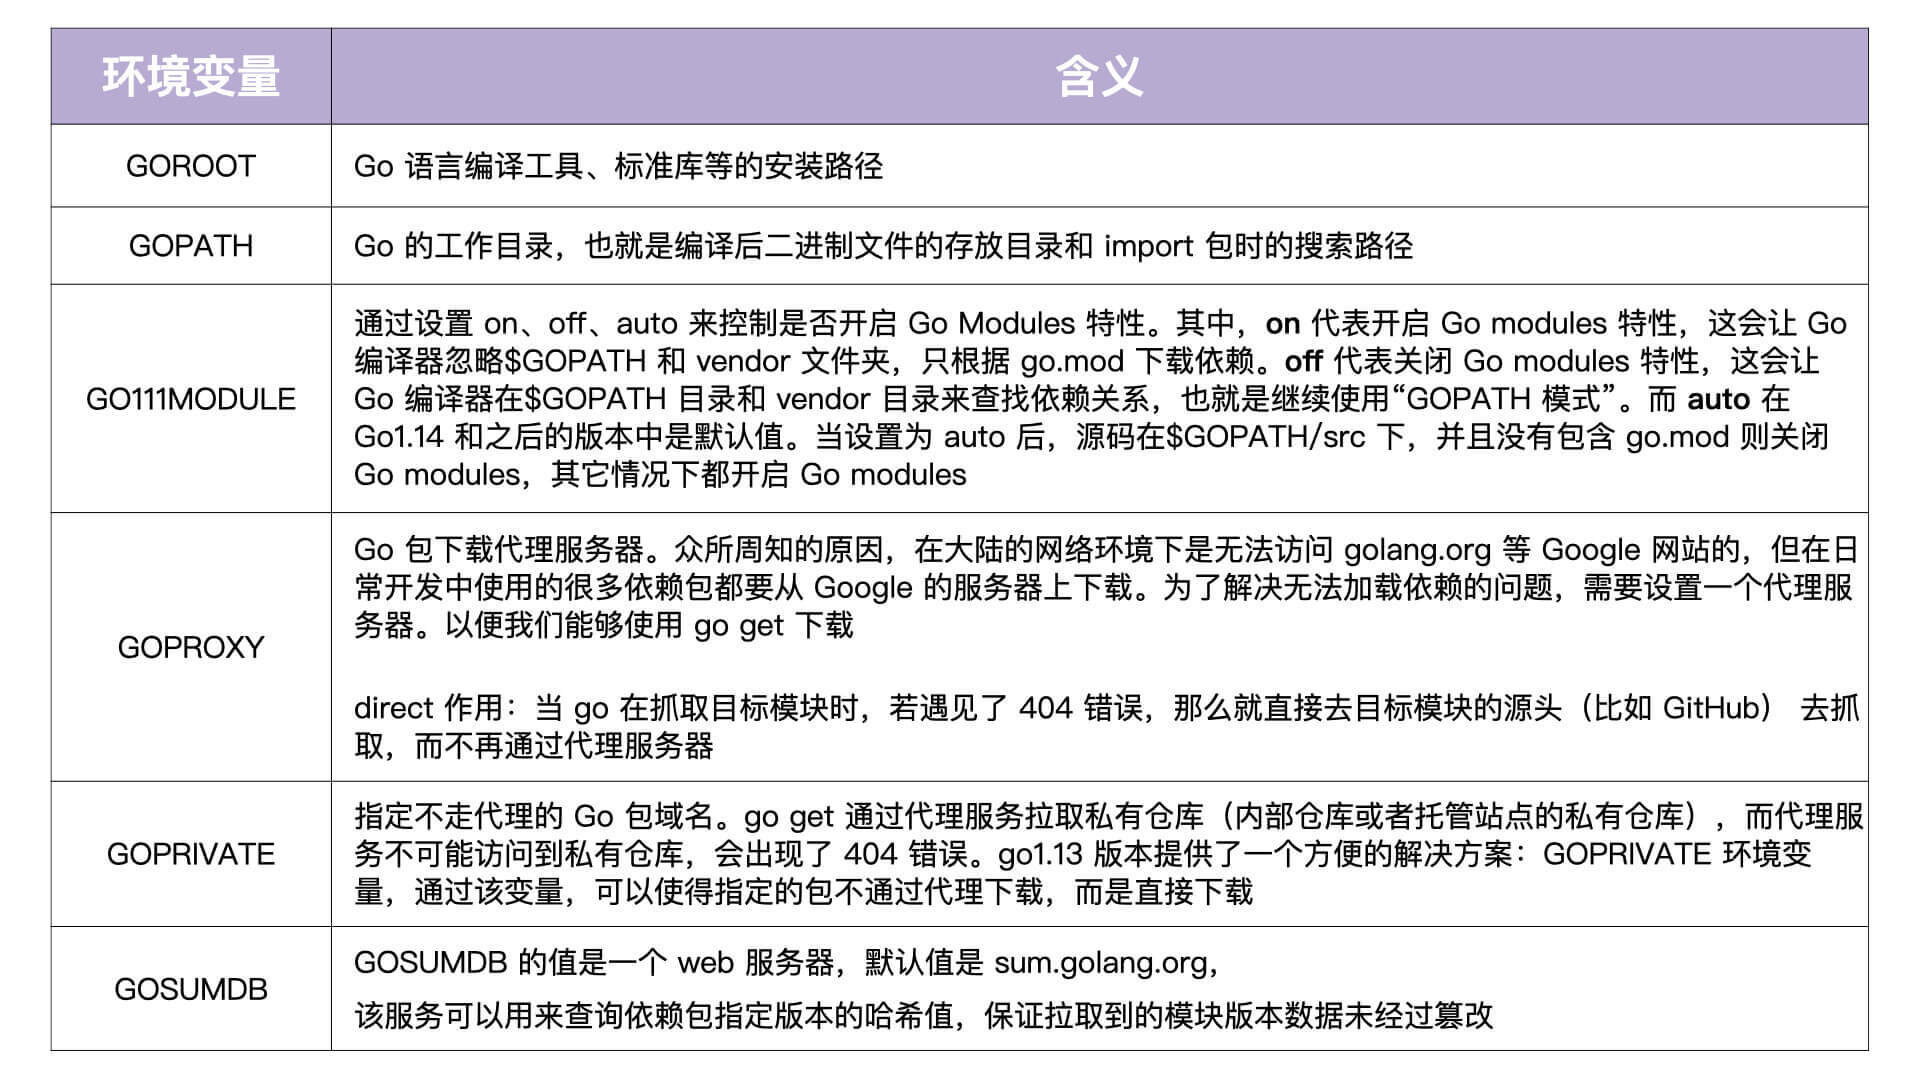
为什么要增加这么多环境变量呢?这是因为,Go 语言是通过一系列的环境变量来控制 Go 编译器行为的。因此,我们一定要理解每一个环境变量的含义。
|
1 2 3 |
$ bash $ go version go version go1.17.2 linu x/amd64 |
ProtoBuf 编译环境安装
|
1 2 3 4 5 6 7 8 9 10 11 12 13 14 |
# 第一步:安装 protobuf $ cd /tmp/ $ git clone --depth=1 https://github.com/protocolbuffers/protobuf $ cd protobuf $ ./autogen.sh $ ./configure $ make $ sudo make install $ protoc --version # 查看 protoc 版本,成功输出版本号,说明安装成功 libprotoc 3.15.6 # 第二步:安装 protoc-gen-go $ go get -u github.com/golang/protobuf/protoc-gen-go |
安装 MongoDB
1、配置 MongoDB yum 源,并安装 MongoDB。
|
1 2 3 4 5 6 7 8 9 10 |
$ sudo tee /etc/yum.repos.d/mongodb-org-4.4.repo<<'EOF' [mongodb-org-4.4] name=MongoDB Repository baseurl=https://repo.mongodb.org/yum/redhat/$releasever/mongodb-org/4.4/x86_64/ gpgcheck=1 enabled=1 gpgkey=https://www.mongodb.org/static/pgp/server-4.4.asc EOF $ sudo yum install -y mongodb-org |
2、关闭 SELinux。
|
1 2 |
$ sudo setenforce 0 $ sudo sed -i 's/^SELINUX=.*$/SELINUX=disabled/' /etc/selinux/config # 永久关闭 SELINUX |
3、开启外网访问权限和登录验证。
|
1 2 |
$ sudo sed -i '/bindIp/{s/127.0.0.1/0.0.0.0/}' /etc/mongod.conf $ sudo sed -i '/^#security/a\security:\n authorization: enabled' /etc/mongod.conf |
4、启动 MongoDB。
|
1 2 3 |
$ sudo systemctl start mongod $ sudo systemctl enable mongod # 设置开机启动 $ sudo systemctl status mongod # 查看 mongod 运行状态,如果输出中包含 active (running)字样说明 mongod 成功启动 |
测试
|
1 |
$ mongo --quiet "mongodb://127.0.0.1:27017" |
创建用户
|
1 2 3 4 5 6 7 |
$ mongo --quiet "mongodb://127.0.0.1:27017" > use admin switched to db admin > db.createUser({user:"root",pwd:"iam59!z$",roles:["root"]}) Successfully added user: { "user" : "root", "roles" : [ "root" ] } > db.auth("root", "iam59!z$") 1 |
参考文章:https://time.geekbang.org/column/article/378076


